Like most turners, my first experiences with the skew were tense sessions sometimes ending successfully and sometimes not. Of course we all have known the agony of defeat, experiencing at least one “catch” in our career. And even if you haven’t you have heard the tales from other happless turners. Over time I was able to master the tool and in fact, now use it with complete confidence – even making flowing pommel cuts and roughing from a square. How did I get here from there? By simply applying the ABC’s of cutting with a turning chisel. And practicing.
ABC: anchor, bevel, cut. Anchor the tool on the tool rest, apply the heel of the Bevel to the work first, rotate the cutting edge toward the work until it engages the work so that it begins the Cut, supported by the bevel. It’s just that easy. The dreaded “catch” (with any turning tool, really) occurs when the cutting edge is unsupported by the bevel.
I have long suspected that the greatest barrier to turners first learning the skew is the fear of the tool generated by the horror stories told around campfires by turners who have gone before them. They are legion. because of this built-in fear, they just know that disaster awaited – a self-fullfilling prophecy. One day I set out to prove to myself that this was the case. I talked a friend into buying a lathe (screaming deal on an old Beaver) and he agreed, subject to me teaching him how to turn. He had never heard of the dreaded skew. On the Big Day I decided to try my theory, so told him we were starting with the easiest tool: the skew. I explained the ABC rule and he pushed off, happy that he would reach the far shore safely. Before lunch he was roughing, turning smooth barrels and actually rounding a few broad beads. After lunch we tackled the gouge, a far more difficult tool. He was glad we had saved that less stable tool until later when I showed him how the side could catch if the tool was not supported on the rest in line with the cutting portion of the curved cutting edge. So there you have it, pre-concieved notions can do amazing things.
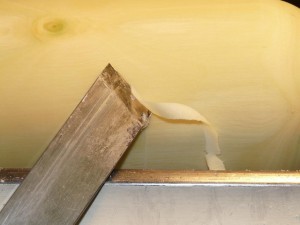
I believe that anyone can use a skew with confidence if they observe a few basic principles. First, of course, apply the ABC rule as you would with any turning tool used for cutting. Second – and this one is often the key – use only a sharp tool. If the edge is dull it will be held off the work, supported by the heel of the bevel and the rounded shoulder behind the edge, therefore effectively flying above the work. To make the edge cut, there is a tendancy to twist the handle to engage the edge thus removong support for the tool, allowing the edge to dig in and the catch begins. This can also occur if the tool has not been honed after grinding. When fresh off the grinder there is a burr on one side of the cutting edge, so the tool cuts very well one way but not the other (the side with the burr). If the burr side is used there is the same tendancy to lift the heel of the handle to engage the cutting edge and the catch begins. The point here is to hone both sides of the tool using the heel and toe of the bevel as a guide (same as ABC). The tool should be presented to the work at such an angle that the heel and toe of the bevel bear on the work in a line 90 degrees from the work. That way there is no “turning moment” or twisting action caused by the downward thrust from the rotating piece. This is actually true of all turning tools. In general you will be using the center portion of the tool’s cutting edge for most work when holding the tool in this way when turning straights, tapers or barrels (yes, and even shallow coves). If cutting beads or pommels only the short heel of the edge is used, otherwise the cutting point will not be 90 degees in line with the heel contact point and a catch or dig will result. In this case, a ring of waste wood ahead of the tool rather than the usual ribbon indicates proper cutting as in the photo above. If you are getting two short tapers instead of a rounded bead, this is your problem.
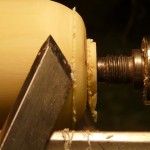
It often helps a great deal when learning to use any turning tool, to turn the lathe off and place the tool against the rounded stock (spindle or bowl) following the rules described above (see top photo in post). It’s far safer than when the lathe is under power, hence a lot less scary. At that point, holding the tool with one hand and turning the work with the other, it is easy to see what is going on. The real learning begins when you place the tool in less than optimum positions to see what happens as in the photo at left showing the start of a catch.
So first, use only sharp tools – scary sharp. Second; follow the ABC’s. Keep the supporting portion of the bevel in line 90 degrees to the rotating work. Third; practice, practice, practice.
As always, I encourage your comments and questions, so please refer to the tag line at the bottom of the article to post a comment.


Very well written Ed. Glad that I came across this.
I kinda did the same thing with my grand daughter that you did with your friend
When she was nine. She wanted to make a pen for her step-father.
I had two lathes side by side and we set them up to turn pens.
I took two skews and told her to do what I do. Kids learn very quickly
I did not tell her the skew was dangerous or not dangerous. I just gave it to her and
and with close eye and ear on her lathe we turned some pens.
Thanks for this very useful resource. In my experience, self teaching with many tools such as roughing gouges, fingernail gouges, scrapers etc, has worked well. Read books and watch videos etc. The problem which arises with a skew in my opinion, is that it is not as easy to learn and it needs more control. If the tool is allowed to drift down the workpiece for instance, a nasty catch occurs. When you cut pommels, bevel rubbing is not easy to get right. I think it is probably the one tool where I’d like some personal tuition. I turn pommels on big (6 inch square) timbers and if you can deal with being scared for an hour in the day, it produces a good finish.