To go along with our email gift cards, we have just received our plastic gift cards. They can be loaded for any amount you like.
Know a woodturner who wants to improve their skills or learn something new, or someone who wants to try their hand at woodturning? Why not give them a gift card for lessons.
Or are you looking for that special gift for someone who is hard to buy for. We have some items in the woodturning inventory and Ed can always custom make something for you or your giftee. Give them a gift card to pick out their own treasure or have one specially made for them.
You can’t order these on-line like the email gift cards. You can get them in person, or just give us a call or drop us a line and we’ll have it shipped off to you.
We have just started something new! We now have eGift cards on our spinning site. They can also be used for Ed’s Woodturning for custom turned items, lessons, or something that we have in stock. Just click on the link here.
At the moment, we only have eGift cards, but hard cards are coming in the future, by the Christmas season for sure. You can purchase cards in the already set amounts of $25, 50, 75, 100 or you can click on the custom button and pick your own amount from $25 – $500.
If you have any questions, but all means, send us an email, or give us a call.
When we’re turning, all kinds of things happen that cause outcomes – both good and bad – that contribute to the final piece that we are creating. Understanding why those outcomes occur is what makes the difference between an enjoyable experience or, sadly, sometimes a stressful or even a frightening experience. Being aware of the direction of the force exerted on the tool by the rotating wood, how you control the force that you apply to the tool and generally considering the various things that impact the path of the tool is the key to getting the result you are working toward. Various “occurrences” at the lathe may seem like a mystery but in some cases, you may already be aware of the contributing factors, just not some of the connective tissue. Have you ever found yourself clenching, knowing that you are about to get a catch, for instance? You know it’s coming but you don’t know why. You just haven’t connected the dots yet. Let’s try to put those dots together in an understandable way.
I apologize in advance for the long read but there was a tremendous amount of information packed into my demo. Since “showing” is essentially pictures, and each picture is worth a thousand words…
Catches
It’s fair to say that the fear of getting a catch is the largest cause of stress and therefore hesitation and uncertainty in woodturning. If you understand what causes a catch, you are 95% of the way to preventing them. There are two – only two – causes of catches.
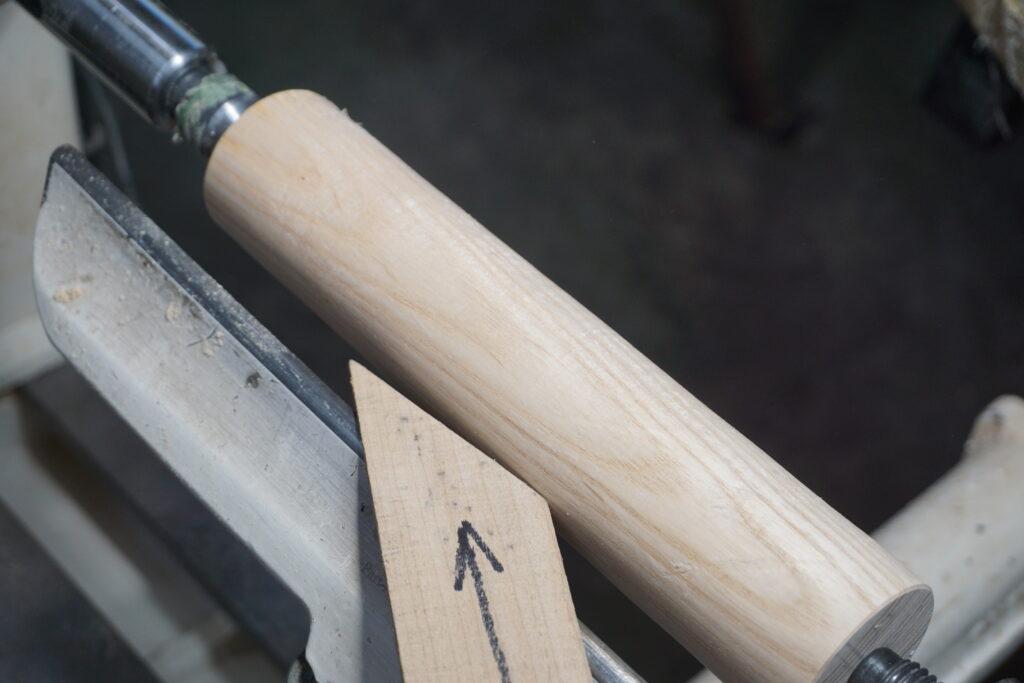
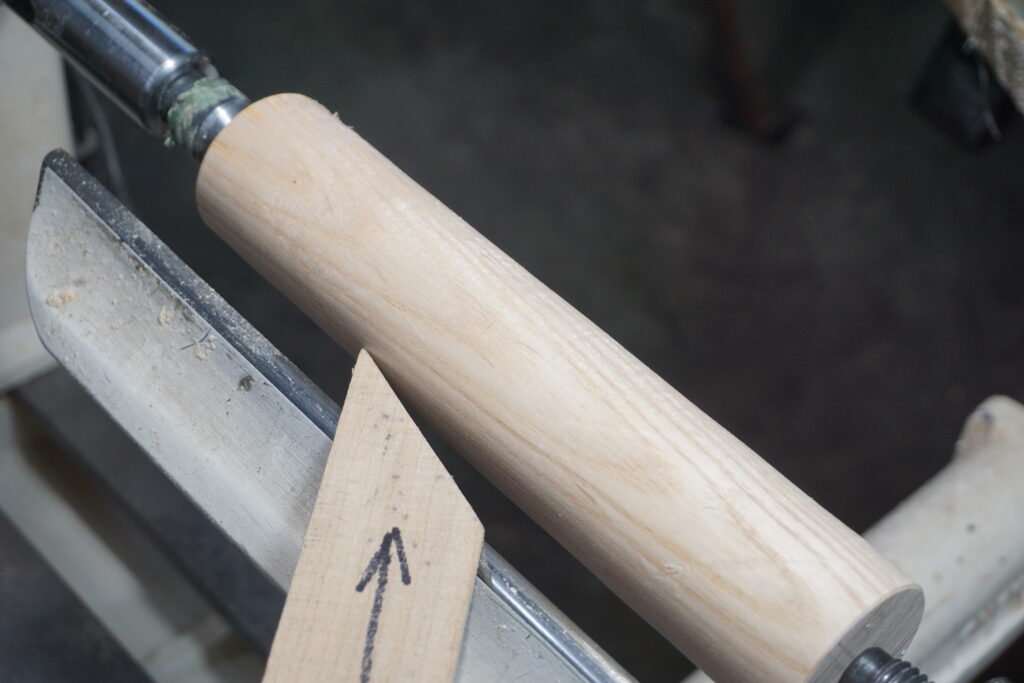
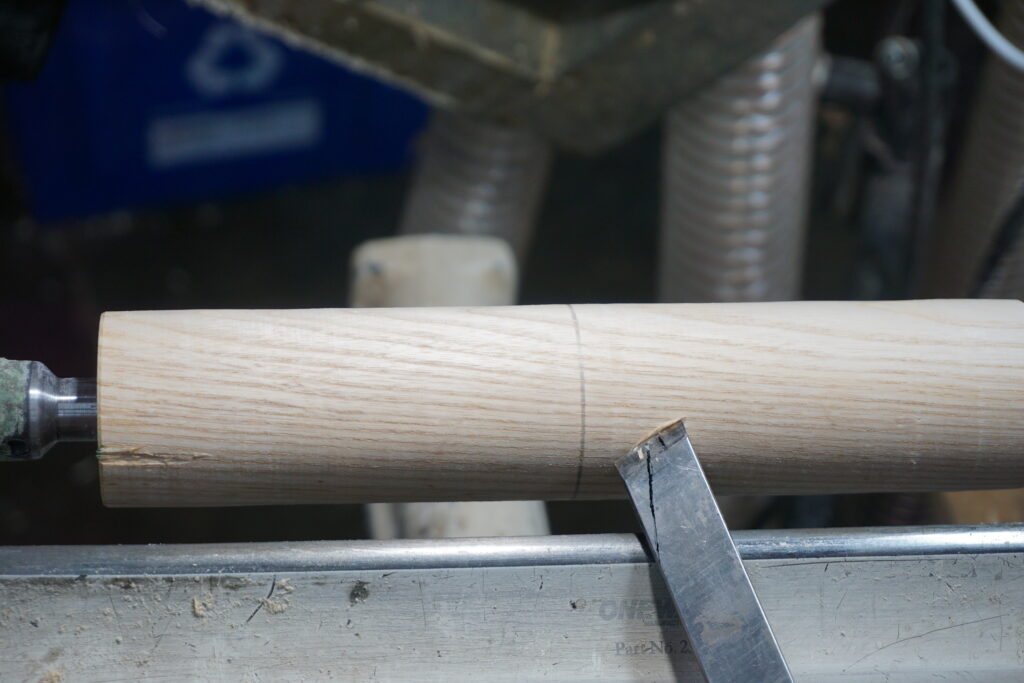
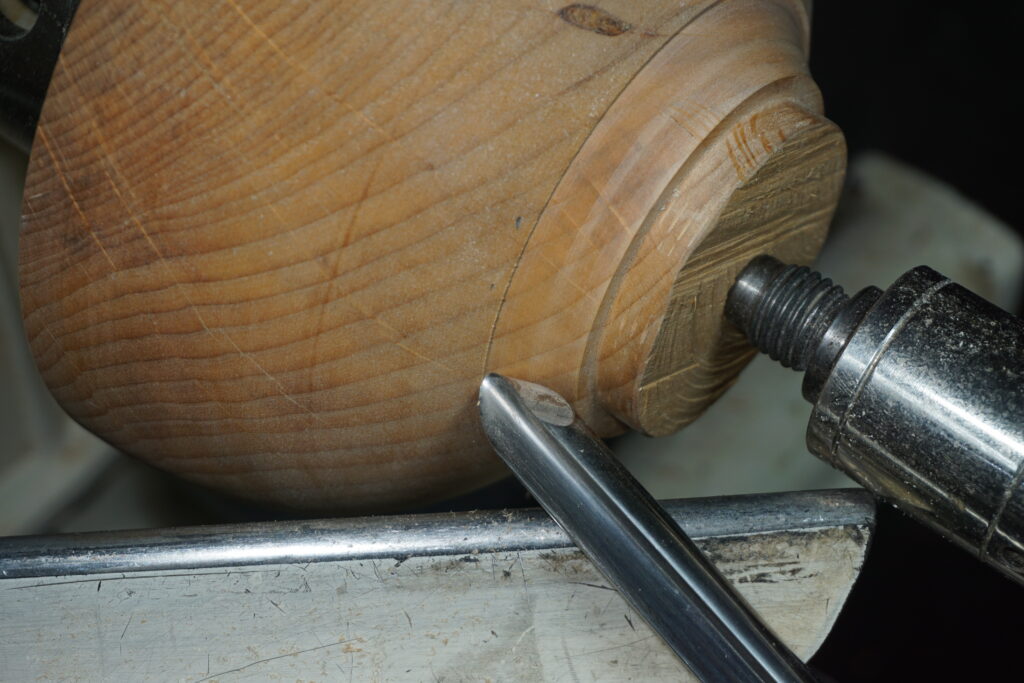
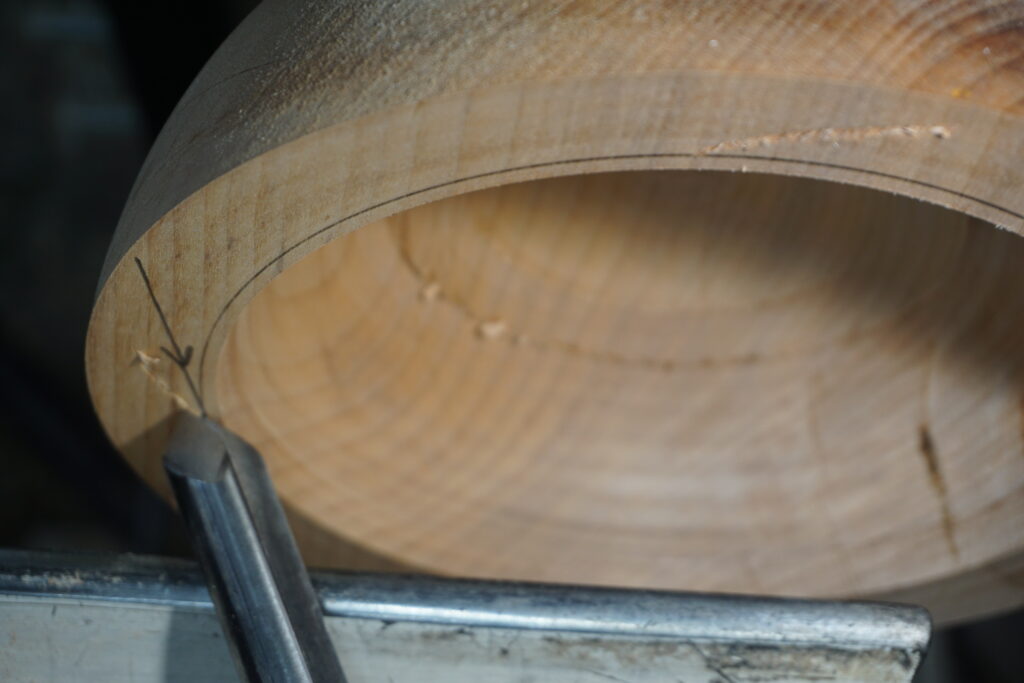
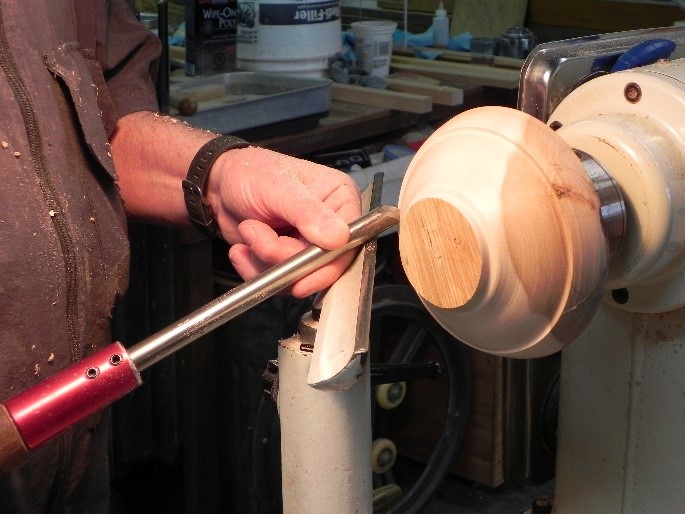
The first occurs when addressing the wood with the cutting edge first (see photo 1). This can be intentional or by accident. We know the tool wants to go in the direction the bevel is pointing. In this case it’s pointing into the wood so that’s where is goes – with varying intensity. The solution is to address the wood with the heel of the bevel (see photo 2) then use that as a fulcrum to close the cutting edge onto the wood. When you approach the wood with the tool, don’t try to “nail it”. Emphasize the placement of the heel on the wood.
Photo 2
Photo 1
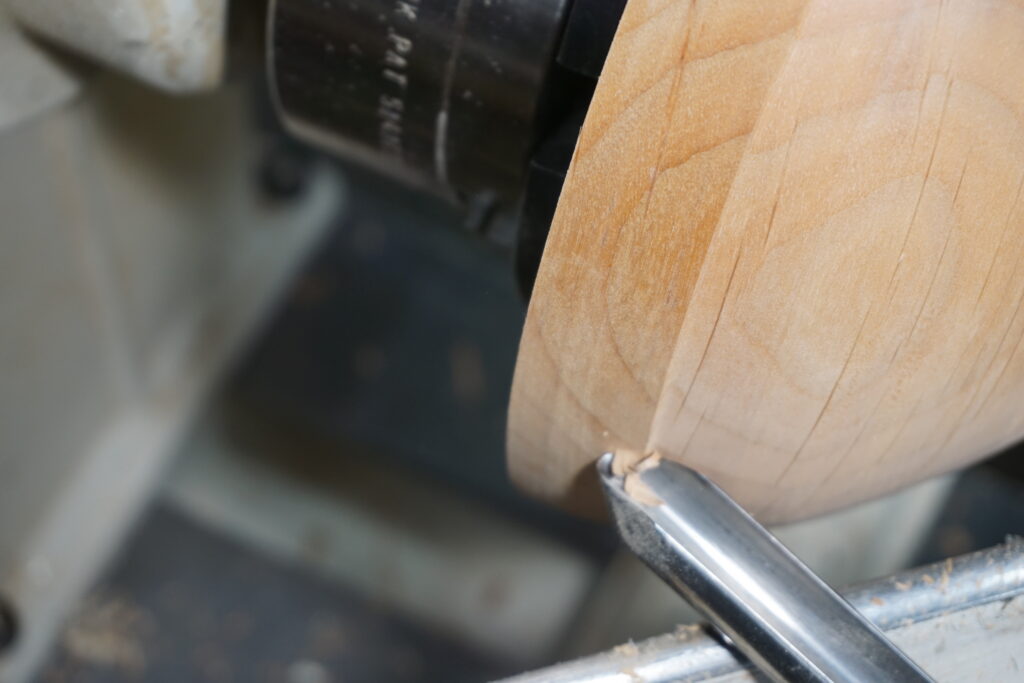
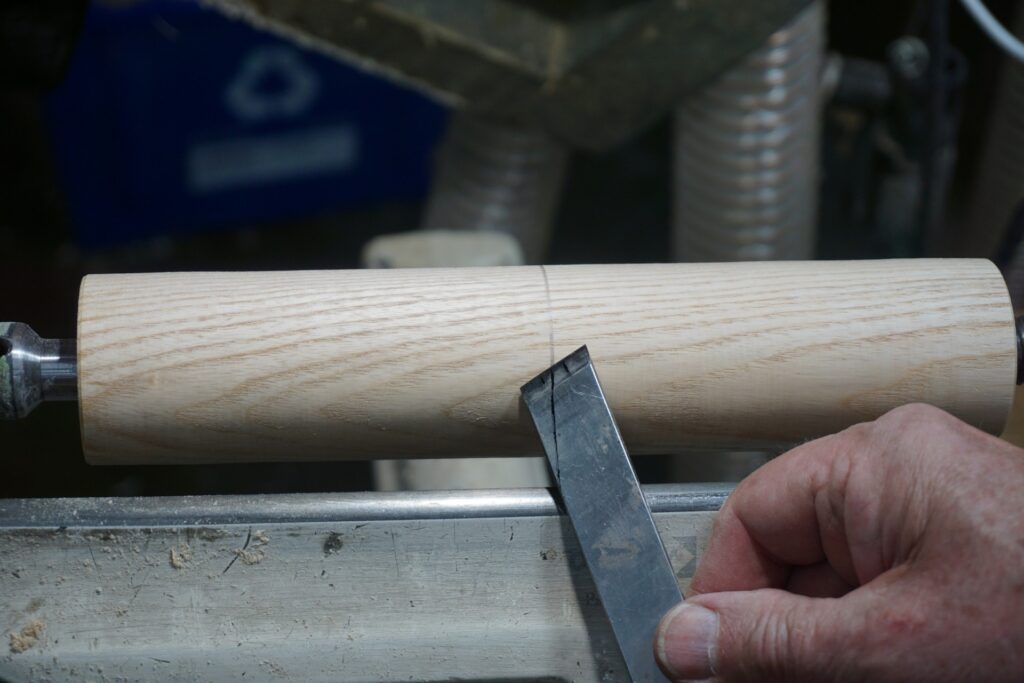
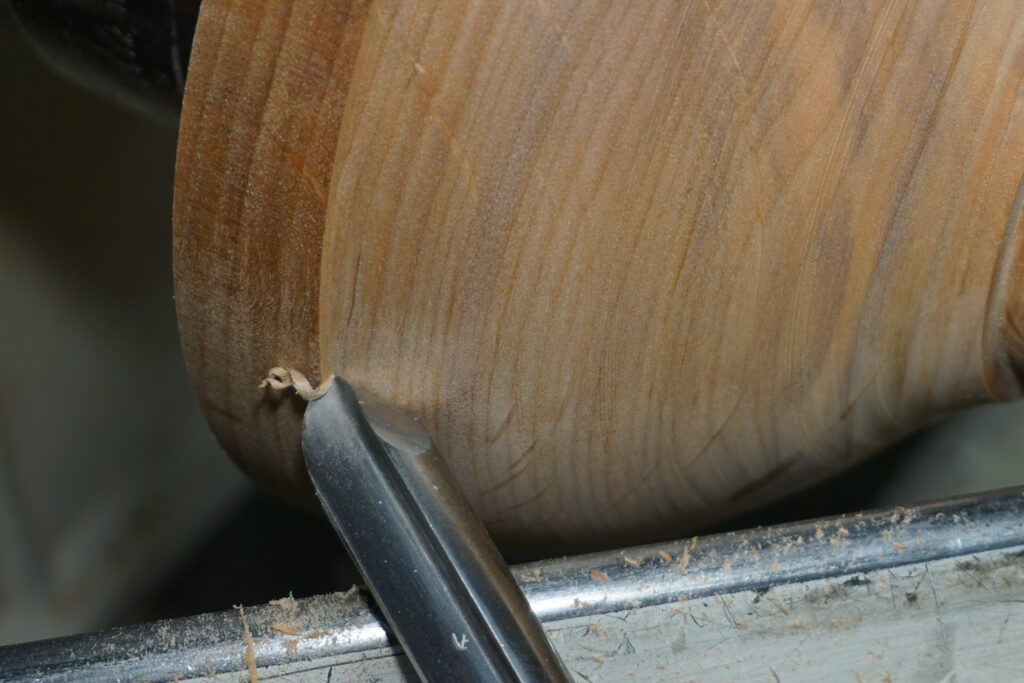
The second – and the least understood – is when the “support point” (contact point of the tool on rest) and the “load point” (cutting edge on the wood) are not in line with the rotational force at the point of contact. That force is essentially vertical when cutting at the 9 o’clock position (just above center when turning a bowl) on the wood. On a tool with a round shank (i.e. bowl gouge), this can cause a rotational force on the tool resulting in the cutting edge digging in progressively deeper as the wood rotates. In photo 3 you can see that the downward force (chip on the cutting edge) is not in line with the support point (bottom of the tool on the rest), so will roll the tool into the wood. This is also an issue with a skew since it is resting on one corner on the tool rest. On a bowl gouge, the indicator is the cutting point on the bowl gouge is moving from the “bottom” of the flute to the “side” or the wing on a bowl gouge (when the tool is held roughly in a horizontal cutting position). On the skew, if the cut occurs at about the middle third, life is good (see photo 4 showing the support in line with the force). If it moves toward the long point of the skew, life is about to become bad (see photo 5). In my book, a bowl gouge catch makes a skew catch look like child’s play, probably because it grabs a bigger chunk of the pie.
Photo 3Photo 4Photo 5
To prevent the classic catch on the outside of the bowl about 7/8 of the way toward the rim, keep the flute open at about 45 degrees all the way around the bowl (see photos 6 and 7). This keeps the load point and support point in line with the downward force. For folks who simply stand at the lathe without using their legs and body to drive the cut, the only way of keeping the bevel in contact is to roll the tool open. When the tool becomes close to being wide open (looking straight down into the maw of the flute) the cut is happening on the side of the wing and disaster is about to strike (see photo 8). The answer is to move your body to keep that gouge open to no more than 45 degrees. More about that further on.
Photo 6Photo 7Photo 8
While on the Subject of Catches
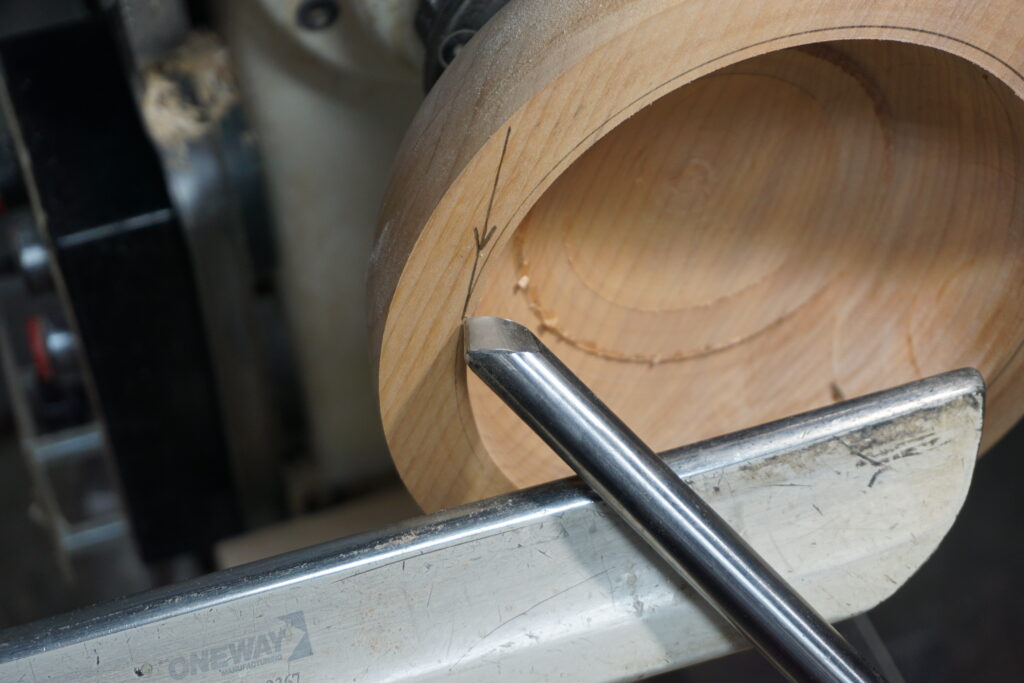
Since we’re talking about the rotational force of the work exerting a downward force on the tool, let’s talk about entering a cut on the face of the work (we’re talking bowls here but it’s the same in spindle turning when using a gouge to cut a cove). When turning at about center, the rotational force is basically vertical at the point of contact with the face. If the very tip of the tool is at an angle with that force, the tool will tend to run in that direction. If the tool is vertical and in line with the force, it will remain stable (see photos 9 and 10). If leaning toward center it will go toward center, if leaning toward the outside it will go toward the outside (see photo 11). The farther you are from center, the greater the force. Understanding this, you will never again ruin the rim on your almost-complete bowl. If the tops of the flute are vertical (100% closed), the tip is in line with the rotational force, and the tool will remain stable.
Photo 9Photo 10Photo 11
To further enhance your control
Pushing the tool forward to start any cut offers no control because you have no “brakes”. You generally don’t have a lot of control over the speed of entry. To have control over the “speed of entry” and also have “brakes”, lower the tool into the work rather than pushing the tool into the work. To do this, lower the back of the tool significantly, place it very near the surface of the work, anchor the tool on the rest then slowly raise the back of the tool. The tip will move closer and enter the wood very slowly because you have greater control over how fast you raise the tool over a significantly longer distance. You can also stop lifting at any time, therefore you have “brakes”. This meethod will also buy you a lot of “fudge factor” if your tool isn’t placed exactly correctly because it will cut its way into the wood rather than shocking it. Personally, over time, this has become the way I start every cut.
Your hands have different jobs
At a normal lathe (without a rotating headstock) when turning a bowl, your left hand is typically forward and your right hand is back. The power from your legs to drive the tool forward should come through your back hand driving the tool forward. The front hand’s job is to steady the tool and absorb the vibration. The added advantage is that the forward thrust along the centerline of the tool aids in keeping the tool nicely registered on the wood. Using the forward hand to power the tool tends to relieve that pressure causing chatter or even steering the tool out of the cut.
To do this, it’s wise to hold the tool with your left hand in such a way that it’s impossible to pull the tool. I usually pinch the tool (because you have to pull the tool to enter a cut: see below) with my thumb and forefinger then morph that into a position where they are simply resting on the wings of the flute. If your fingers are “behind” the tool, it’s almost a certainty that you will pull the tool (see photo 12). Experiment in air off the rest. If your grip is such that you can pull the tool, then you will do that on the work. Try to find a grip that works for you.
Photo 12
Of course there is always an exception. To drive the tool forward with the back hand requires that the tool is on the wood so that the bevel can direct the tool forward. When you are off the wood at the start of a cut, of course you need to engage the rest with your forward hand then draw the tool into the wood with that hand. Once the bevel is on the wood, simply roll your hand away from the rest and carry on.
This is valuable information for left handers because the natural thing is to power your tool with the dominant (forward) hand. Not doing this is difficult I am sure, but at least knowing there is an issue is a start. Most left-handers have adapted to many things in this right-handed world so sometimes it’s not so difficult. If it is a significant problem, an alternative is to get a lathe with a rotating headstock or a sliding headstock to work off the end of the lathe. This will allow you to place your right hand forward and your left hand at the back where it can do the most good.
A common left-handed (left back/right forward) cut is when making a seriously heavy cut on the outside of a bowl. In this case you are using both hands to drive the tool into the cut and forward. It’s a viable technique but not typically used when making most cuts.
If you’re a spindle turner (Yay!), handedness is a non-issue. It’s only those needy bowl turners who have to deal with this. (I hope you know I’m kidding).
It’s a tool rest, not a tool guide
I see many turners engaging the tool with their forward hand at all times. So much so, that they may have to be surgically removed. I believe this comes from the aforementioned uncertainty which is probably from experiencing some pretty scary catches.
Clearly there are times when you need to engage the tool rest with your forward hand – but there are also times when doing so is a huge impediment. So how do we decide? The cutting edge always needs support, so: a.) When the cutting edge does not have support from the wood, engage the rest with your forward hand. b.) When the cutting edge does have support from the wood, do not engage the tool rest with your hand. What this boils down to is “trust the bevel” to get the tool to go where you want it to go. In reality, it’s more like “trust yourself”. We all understand that the bevel controls the direction of the cut, so let it do its job.
By engaging the tool rest with your front hand while making a cut, a couple counterproductive things happen. First, the power provided by the back hand is often reduced or negated by dissipating that force into the tool rest instead of the wood. This is a common cause of chatter. Secondly, if the hand is engaging the rest, you have to devise some alternative method of “getting around the corner” on the outside of a bowl. The same thing happens if your hand is hanging down and eventually runs into the tool rest.
I have heard people say to use the tool rest to make a straight cut. That works only if, a.) you set is correctly and b.) it’s a straight cut. What do you do if it’s a taper or there is a curve involved? I can’t say it enough: Trust The Bevel! I produce straight rollers for a customer and have developed an effective way of making a straight, axial cut. They have to be within 0.015” (1/64”) on each end. Size your piece at both ends (and the middle if a long cut), start making your cut from one end but aim the bevel high (make the diameter progressively larger and larger). With each successive cut, aim the bevel lower and lower until you reach the desired diameter at the other end. Remember to use your whole body to power the tool. Standing soldier-like will not get the job done.
Opening the Flute
From my experience with years with students, right out of the gate, about 50% naturally do this operation correctly and 50% incorrectly. I watch and if they do it correctly, I reference it later for the record. The other half I deal with it right away. You will be in one of these groups.
This seems insignificant but it makes enough difference at the start of the cut that if you roll the tool open incorrectly, you end up with a vase instead of a platter.
Imagine there is a wire running through the center line of the tool. Rotate the tool around that axis. While opening the flute causes some altering in the position of the contact point of the bevel (ultimately, the direction it’s going to go), the “wrist up/wrist down” (or forearm up/forearm down) motion keeps that change to a minimum.
A “hand up/hand down” motion while the forearm remains fixed produces greater a swinging/sweeping motion at the tip causing significantly more of a change in bevel angle to the wood. This often makes a huge change in the direction at the very start of the cut resulting in difficulty achieving the desired form.
To visualize what I just described as the correct motion, loosely grip the tailstock quill. Rotate your hand up and down as if opening the flute on a gouge and you will see that the hand rotates around the centerline while the wrist and forearm move up and down.
One nice plus when doing this is to let your forward hand come up with the tool as you open the flute. This will lift your paw above the tool rest so it won’t get in the way when “going around the corner”.
Using your whole body while turning, not just your arms and hands
Under “Catches”, I noted that the “open flute” catch is a result of standing soldier-like at the lathe and trying to turn the outside of the bowl form without using your legs. This is the solution.
When you have to travel any distance (all bowl cuts and long barrel shapes in spindle turning), you will find you need to use your whole body more than just your arms.
Making a forward cut with locked knees can only be done by rotating your upper body at some point which results in the cutting edge making an arcing path centered around your body core. This results in unwanted form, chatters or constantly coming out of the cut. Or all of the above.
Foot placement should be so that your weight is almost entirely on the right foot at the start of the cut and almost entirely on the left foot at the end of the cut. Your cut, then, is simply a transfer of weight from right foot to left foot. Your cut has ended when your left knee is over your left toe. Any further and you will be off balance and in danger of really messing up the form. Everyone learns differently so occasionally I have suggested “just move your left knee forward” and that gets things coming together.
Bend your knees to the point that you feel your quad muscles (more the right at the start of a cut) support the weight of your body, point your right toe slightly in the direction of the cut so that your ankle and knee will work together. Push yourself into the cut from the ball of your right foot, transferring your weight steadily to the left foot. As the cut progresses, you should feel your weight transfer to your left foot. Rotating your upper body at the hips changes the angle of the bevel to the wood, which in turn creates the desired form as it moves forward in the cut.
During this whole exercise, it really helps to firm up your core, making your whole upper body one unit.
Never take a step with your left foot during the cut. Instead, stop the cut and reposition. Making a “fake cut” prior to a cut to see if your left foot can be moved slightly to get a longer cut is a good practice. If you can’t make the whole cut, acknowledge that and make two cuts.
Using your quad muscles (legs) rather than your smaller arm muscles results in far more control, plus the ability to make a super-slow (meaning super-controled) cut, yet under full power. You won’t get nearly as tired, either.
A good rule of thumb for foot placement when turning the outside of a bowl (doesn’t work on the inside) is roughly parallel to the tool rest. Parallel to the lathe when making in-line cuts, 90° fore and aft to the lathe when making crosscuts (facing) and about 45° when making curved cuts.
To illustrate the power and control that you have when using your large quad muscles, picture yourself at a door with a heavy spring closer. Brace yourself and try to open the door smoothly using just your right arm (back hand when turning). Likely the effort will result in an initial lunge and then smooth movement. Now try putting your shoulder against the door and using your legs to power it open. You will find you can open it smoothly and as slowly as you want. If, when you are turning, your cuts have a lunge-lunge-lunge motion, you’re using only arm power. Your tool is probably dull, too 😊.
Where do you look when making a cut?
I’ve been turning for over 65 years and I still can’t take my eyes off the shavings coming off the tool – it’s just so cool – so I understand the urge to watch those shavings. But when it comes to the “money shot”, my eyes are on the horizon on the top of the bowl on the outside and the opposite side of the cut on the inside. But where on the horizon? If you watch the “step” of the cut only that’s not much different than watching the shavings. You need to see the big picture, essentially extrapolating the curve, trying to determine if it’s heading where you want it to go. Look ahead of the cut, just like looking across a curve when driving. This may sound difficult, but it becomes surprisingly natural very quickly. Just like driving a car: look where you want to go.
Thoughts on scraping (above and below center)
I was initially taught to scrape on center. Smack-dab on center, not higher, not lower. Both inside and out. After several years of getting scraper catches, I decided to figure it out for myself. Basically, it’s all about “where will the tool go if it digs in”? Follow the logic:
When scraping on the outside of a form, stay at center (good) or slightly below (better). In the event of a catch the tool will swing into air, away from the wood.
When scraping the inside of a form, stay above center so that in the event of a catch the tool will, again, swing into air, away from the wood.
When doing the “bottom” of the inside, clearly you need to get to center on occasion. Unless you are working with a very vase-like form, if the tool digs in there is no wood below to cause a problem.
Upward sweep.
Rather than maintaining a 9 o’clock position throughout your inside cut, try sweeping upward through most of the cut then arcing down to center. This produces an acute shear angle to the wood (read: cuts way nicer). Generally, sweep upward through what you would consider the “side” of the bowl and arcing down in what you would consider the “bottom” of the bowl. This creates a cut with greater shear (evident from the nicer shavings), makes a cleaner cut and I feel it helps the cutting edge last longer. Way less effort, too.
Pull cut – bevel on the wood
What most turners consider a pull cut with the tool held horizontally is not a controlled cut, because the bevel is not on the wood. It is a peeling cut, useful in removing large amounts of wood that you don’t want, however there is not the level of control needed when refining a form. When the tool is held horizontally, the only way to not get a severe catch is to partially open the flute enough to get that peeling cut but not so far as to be scraping. Allowing the bevel to contact the wood in this case is a guaranteed catch (and a whopper at that).
Because you are using the wing (side) of the cutting edge, the only way to make a pull cut with bevel control is to align the tool with the direction of the rotational force at the point of contact. This usually means an almost vertical position of the tool with the handle pointing toward the floor. In this way the load point and support point are in line with the force, causing no rotational action in the tool. As always, engage the heel of the bevel, close the gap to the cutting edge then proceed with the cut.
Parting thoughts
As in most things, there is always more than one way to skin a cat, so different techniques than I have described may achieve the same result as long as you are considering all the forces. What I am trying to describe is the dynamics that affect the tool on the wood. As long as you understand that, it is possible to achieve a result in a variety of ways.
There are exceptions to every “rule”. Also, if you know and understand a rule, you will know how and when you can break or bend it. You will develop ways to get around problems by understanding what causes things to happen – or not happen – as the case may be. That takes time standing at the lathe. So go out and turn as often as you can, always experiment and ask yourself, “Why did/didn’t that happen?”
Don’t forget the one thing I mentioned during the demo: everything in woodturning is “Goldie Locks”. Not too hard, not too soft, not too fast, not too slow, etc., etc. So much about woodturning has to be “just right” and that feeling comes with time. But take heart, it isn’t always a long time. Just the right amount of time 😊.
Understand that practice does not make perfect; it makes permanent. If you continue practicing something that doesn’t give you a desirable result, that is what will become permanent. My feeling is that in our case, frequency trumps intensity. In other words more often is better than long sessions.
I thought I would take the time to share a few random thoughts about drying wood. I’ve learned a ton about what not to do from my own misguided efforts as well as heeding the sound wisdom of others. The combined total now yields consistent, high quality turning wood when it is dry. Perhaps the best way to present what I have learned is a simple list. It is in random order rather than by importance. When I can substantiate my thoughts I will do so, but in some cases, I can only assume that some facts are correct because I cannot prove them otherwise. The first point is an example of the latter.
General Considerations When Drying Wood
Air drying. Wood (it appears that all species are roughly the same) air dries roughly at a rate of one year per inch of thickness. I can only assume that probably changes depending on climate. Our Wet Coast climate would certainly impact that differently than the drier interior climate in British Columbia. Folks in drier climates have to actually work to slow the drying down to prevent cracking. “Air drying” is simply that – drying at ambient temperatures in open air – as opposed to wood placed in a dry kiln. The time generalization is true up to three inches of thickness. After that, the “rule” is no longer linear. My experience is that air drying probably comes to a practical end at about 5 or maybe 6 inches. I had some black walnut that was 4 inches thick that I know was dry after about 6 years and an 8” piece of maple burl that wasn’t dry after more than 30 years. I assume the linear rule also generally applies to kiln dried wood because I have never seen kiln dried wood thicker than 3”.
Wood in large cross section. Simply cutting tree rounds and splitting them in half (“bolts”, in logger-speak) is the best way to make firewood rather than turning stock. You can seal the ends all you want but it will crack eventually because the wood is unable to move as the water leaves the wood. In raw wood form in large cross section, movement can’t happen, so the stress imposed on the wood can only result in cracking to relieve that stress. An obvious example is the cracked ends you see on milled lumber even after sealing. When leaving wood in this form out of necessity (i.e. milled lumber) the only thing you can do is allow for some loss by cutting it longer than needed. That’s a practical approach when milling common lumber but not with turning wood. I have, on a couple of occasions, brought a full log home and cut what I needed as I needed it. I got some minor loss over time as I processed it from one end and significant loss on the other end, but it was just not practical to process the whole log at one time. Not everyone has the literal real estate to do that, however. Cutting “rounds” for future bowls is unsuccessful because just like a board, sealed or not, the wood cannot move and your 16” blanks will only yield a 10” bowl at most. The only successful way to cut rounds is from a previously dried board.
Flat stock. I have dried a lot of wood for spindle turning and smaller items such as lidded boxes or other smaller items, both utility and decorative. This is easily done by essentially cutting shorter “boards” from tree rounds that are generally cut for bowl stock. Of course, just like any “board”, some loss must be expected. These shorter lengths are more easily stored and handled than longer boards and at least makes use of wood that is otherwise lost while making bowl blanks.
Rough turning. The only sure way of minimizing waste when processing green wood for turning bowls is to rough turn the wood into bowl forms, sealing the end grain areas then racking the wood up in an outside area that is out of the rain and sun. This allows the wood to move as it dries and actually speeds up the process since water leaves the wood through the end grain and those ends are very close together, unlike a simple board where the ends are many feet apart. Of course, if you have the ability to “core” bowl blanks from a larger blank, this further enhances the efficient use of the wood.
Considerations when Preparing Rough Turned Bowl Blanks
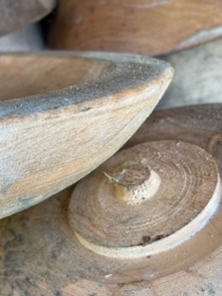
Rough turning details. I was first taught that rough bowl blanks must have even wall thickness to allow even drying and thus, less cracking. That is absolutely not true! In fact, that is the best way to guarantee that the blank will crack near the bottom on the outside at what I call “the turn of the bilge”: basically, that area where the side becomes to bottom.
Cracks resulting from keeping even wall thickness in a 16” bowl blank.
The rough turned blank will want to bend upwards at the ends or sides (depending on grain orientation) so it needs to be thin enough to bend in that area. After agonizing over all my losses, I finally found a video from Glenn Lucas explaining how he prepares a rough-turned bowl blank. Since he turns literally thousands of bowls every year, I feel he is a bit of an authority. These are now the guidelines I follow for a flat-grained bowl blank (not end grain):
a) Leave the bottom of the blank about ¾” thick not including the tenon. The rationale is that wood shrinks very little – if at all – across the flat grain so that leaves plenty of wood for the bottom wall thickness.
b) Allow 10% of the diameterof the blank wall thickness at the top of the bowl only but taper the wall thickness from that point to the ¾” bottom. It would seem counter intuitive to taper the wall but consider this; the actual diameter is reduced as the bowl approaches the bottom so if you use the 10% rule, that wall thickness will become progressively thinner as you approach the bottom. In practice, that thinner wall will allow the blank to move instead of cracking as it dries. Since I have used this guideline, I haven’t lost a single blank and have never not had enough wood to complete the bowl. (My English teachers are rolling in their graves over that double negative 😊). The act of rough turning lots of bowl blanks has an added advantage in that you get to practice your turning technique without the expectation of achieving a “dead on” form, thus taking the pressure off, allowing you to make lots of cuts that are “close, but no cigar”. I find the 10% rule seems to vary a bit by species and is a bit extreme for anything over about 14”, so you will have to learn the ideal dimensions as I did, through trial and error.
c) There should be no sharp edges on the top rim. This “rule” seems to be general knowledge, but not necessarily to everyone. A sharp edge will dry very quickly (even in the first hour) so tiny cracks will appear that are the seeds from which large cracks grow. The solution is to round those sharp edges over, preventing the rapid drying.
Rounded edges to prevent immediate drying.
d) When processing log rounds, don’t get greedy by coming too close to the pith. The tighter the ring, the greater the stress. Err on the wider side when taking the center slab/pith out of the tree round, i.e. 3” in a 24” trunk. This can be a major source of particularly rim but even bottom cracks (depending on orientation) in a bowl blank.
e) A wax emulsion is generally accepted as the most practical way of sealing to prevent cracks. Paint, is not. Clear wax emulsion is best for our purposes – it does come in opaque colours – because it’s handy to see the grain for proper orientation for final turning. The point of “sealing” the wood is to allow a slower egress of the water from the wood, not stop it altogether. Slowing the drying process gives the wood a chance to move as it dries. I don’t know if paint seals or doesn’t seal the wood, but anyone I know that has used paint has not had any success. In any case, you can’t see the grain and it’s certainly not cheaper than actual end grain sealer.
Alternate Methods of Drying Wood
It is possible to slow the drying process in other ways, but they are labour intensive or only good in the short term. They are fine for a few but not for many. Using paper bags and swapping dry bags for damp bags works quite well. I have used that method successfully, but you need to monitor them daily. Burying a blank in its own shavings works really well for an overnight or couple day pause in turning but isn’t practical in the long term. Wrapping fresh-cut bowl rounds with shrink wrap works for a few days but promotes mould growth amazingly quickly. I can’t understand the logic, but I have heard of people swapping plastic bags in a similar way to using paper bags, but I can see that mould would be a constant issue due to the free water that stays on the wood’s surface.
Microwave drying is a valid option for individual small pieces. I have my own microwave. It’s a microwave designed specifically for woodturners. You can Google the source by searching “get your own damn microwave” 😊. My recommendation is to set it on “defrost” (definitely not “high”) then program it (if available) or time it for ten minutes on defrost and ten minutes rest (depending on power rating, of course). That setting can make it too hot to hold so it’s definitely hot enough and judging by the amount of moisture on the window during the rest period, more water is driven out in the rest period than when being heated. If you can’t program it, make sure you set a timer so that it doesn’t’ cool off too much during the rest period. Use a moisture meter or a weighing method to determine when it is “done”. The lack of moisture on the glass is a pretty good indicator as well. This is a method more suited to “turned to finish”, thinner pieces since it is going to move very quickly in a short space of time, so rough turned (read: thicker) pieces need not apply.
Using a large dry kiln is much easier than you might think and the result is similar to air dried wood since high temperatures are not used (normal kiln dried wood is terrible to turn compared to air dried) There are two types and I have both.
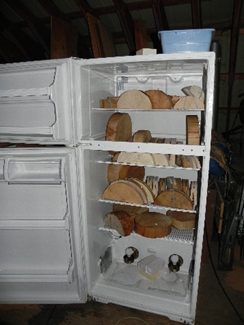
Making a Large Dry Kiln
Step 1: A classic is to get your hands on a dead fridge or upright freezer. It’s fairly critical that it has wire shelves to allow maximum air movement. Be mindful of the fact that the cooling medium is probably bad for the environment, so leaving the compressor intact is a viable option. Make a hole on each side of the body near the bottom (mine has 1 ½ holes) and one on the top (mine has a 2” hole) to allow for natural convection. Those dimensions were determined after much scientific experimentation (seriously kidding). It’s a good idea to cover them with coarse mesh to keep the mousies out. Mine has two light sockets inside and I use combinations of wattage and one or two incandescent bulbs at the bottom to achieve the heat I need, depending on time of year. Due to the fact that LED’s have replaced incandescents, probably the most practical replacement is ceramic heating elements that screw into light sockets (readily available on Amazon). I’m certain they are also safer.
Step 2: Using an internal thermometer to measure temperature, I start it off at about 75°F for a week or so then move it up to 95°F until the wood is dry. I use an electronic meter to measure the moisture content but weighing pieces and recording their weight until the weight doesn’t change is equally or possibly more accurate. It’s not unusual to have dry wood in 6 to 8 weeks.
Converted fridge dryer
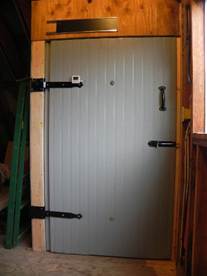
Step 3: Going a little more techy, plus spending a few more bucks will get you a kiln using a regular household dehumidifier. A fridge won’t work for this because the dehumidifier will take up most of the interior space. I suppose you could have one on the outside and connect it with ducting but that is probably tougher than building a larger, simple enclosure. I was fortunate to have composite freezer walls available, but a simple 2×4/plywood (preferably insulated) enclosure will work. Build it with racking that allows air flow and wire it so that a dehumidifier can be placed inside (or drill a hole for the cord). The machine itself generates a small amount of heat so that’s an advantage. You need to allow a way for the water to drain from the unit or be prepared to drain the receptacle (daily at the start). I start mine with a humidity setting as high as the unit allows then take it down gradually to as low as it goes. A slower pace is better than a faster pace. The time required is similar to the fridge/light bulb unit but has larger capacity. Photos below show kiln open and closed.
In Conclusion
As I noted in the beginning, I arrived at these conclusions after losing enough wood over the years for ten people, so definitely know what doesn’t work and what’s not practical. Because I’m a “country mouse” I enjoy the luxury of having a little more space than some folks, so having a full log at my disposal or processing wood at home isn’t an issue. Other than that, being a “city mouse” means that you will be preparing your wood in smaller quantities, but the information that I have shared is equally valid.
Also, because I’m a “country mouse”, one might think that I have access to all kinds of wood. Such is not the case because practically all of the wood standing or on the ground is on private property, so permission must be granted and/or beating the firewood savages to the punch becomes a significant barrier. “City mice” on the other hand, clearly have the upper hand on access to serious turning wood both in variety of species but also in prime physical access on public property – like, it’s on the ground at the side of the street – not a hundred yards through the brambles in the mushy bush. If you are in a highly urban area, you have access to smaller quantities more often, so harvesting smaller quantities of high-quality wood makes the sweat equity worthwhile. Remember: Chain saw = free wood. But also remember that owning and using a chainsaw brings its own responsibilities and safety considerations, neither being a big hill to climb.
So go out there and save that wood from the woodchipper. By taking a bit of care in processing, you will be able to turn all of it, not just half of it.
There are some tools and accessories that are either too large or too specific to individual needs to keep in stock. I have been able to make virtually anything that has been requested. Typically a sample to follow is perfect for custom items but in some cases discussion and a drawing (on my part) does the trick.
Some examples of items not regularly stocked are:
Spinning wheel bobbins. Different manufacturers have different dimensions so having a sample is ideal, but a bit of measuring will do the trick.
Any parts or repairs for spinning wheels. So far, I have had no problem replacing parts that are otherwise unavailable.
Tabletop swifts. I have a model that I make but it’s not that much in demand. It is fully adjustable and spins very easily on a ball bearing.
Any specific requests for either drop or supported spindles. Sometimes people have a request for significantly heavier spindles for plying.
Tapestry beaters. I have some had cut all-wood models (4 TPI) and will have a model that uses reeds for teeth, so more variations in pitch.
Tapestry bobbins. I have recently started making these so may keep them in stock.
Anything that you may need but can’t get. I have a background in making whatever it takes to do a job. If you can imagine it, I can probably make it.
We have been accepted as a Vendor at the Fibres West Show March 20 & 21, 2026 from 9:30-5 at the Cloverdale Agriplex. We are very excited to be attending this event. It should be interesting and fun, and like always we learn a lot. Come on down and see us and all of Ed’s new spinning and weaving tools.
Check out the Fibres West Website for more information on location, activities and vendors. Hope to see you there!
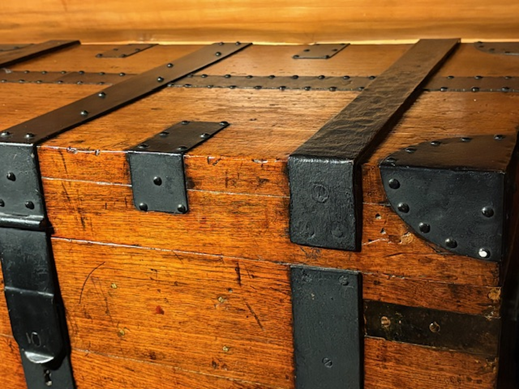
I’m a little laid up right now, so have some time to contemplate the things around me that I find “artistic”, really attractive or just plain cool. Most of it is what I consider “wabi sabi”. I’ve been tossing the idea of writing about wabi sabi in my head for quite some time but as I contemplate an old steamer trunk in our office (more about that later), I am moved to finally put key stokes to screen. I considered keeping those of you who aren’t familiar with the term “wabi sabi” in suspense by hinting at various tidbits line after line, but I think I will forego the drama.
Wabi Sabi is a Japanese aesthetic referring to finding beauty in things imperfect, incomplete or impermanent. Often asymmetry and simplicity are part of the package. It’s about things that are modest and humble and often things that are unconventional. A dandelion gone to seed is at the same time exquisite, symmetrical, yet very impermanent. Perhaps the impermanence puts the whole thing in perspective. So, you see, there is no simple explanation.
It’s good to understand at this point that wabi sabi refers not to just artistic objects but everything that surrounds us.
Not long ago, I got a book about Wabi Sabi so that I could truly understand its meaning. As sometimes happens, you must be careful what you wish for. For something that seemingly is all about “Simple”, it’s unbelievably complex and deep. In seeking the essence of the thing, I found lots of subjective substance but zero quantitative, in the end I came out more confused than I went in. I decided that I liked the fact that it is also something that is easily “felt”, so that works for me. It brought to mind a time when I decided I was going to learn the meaning of First Nation abstract symbols representing all the creatures in their world including themselves. I came away being able to identify many of them but also found that one must grow up in the culture to truly understand the meaning of the interactions between them all.
But I digress…
As a kid I was surrounded by many things from the early twentieth century, assembled by my grandparents. They were well-healed and well-travelled, so some pieces are exquisite art, some are merely decorative pieces but very attractive, and some are well-made utilitarian pieces, but with character. Together, the lot represents many types of skilled craftspeople and artists. I have always – as are many people – been attracted by exquisite forms, beautiful carving and vibrant colours. But many of the pieces that I recalled and kept close were the things that had some flaw, asymmetry or patina that made them unique. That steamer trunk, hand-built like a tank, has at the same time screws symmetrically aligned, wood joints visible but spot-on and rugged iron straps that show the blacksmith’s deftly irregular blows. The dings and scars from rough handling are evident. The package as a whole tells a story that was never intended at its inception but speaks volumes now. Time played a big role in that.
Interestingly, even though all these pieces that I find attractive may be somehow flawed, asymmetrical, or “not beautiful” in some way – none are poorly made. Usually, the craftsmanship is beyond reproach. So, in my opinion, poor craftsmanship doesn’t give a piece an automatic “wabi sabi” buy in. Telling a story does, however.
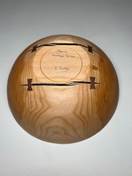
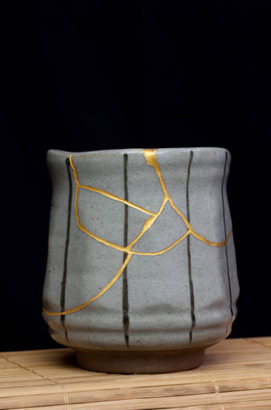
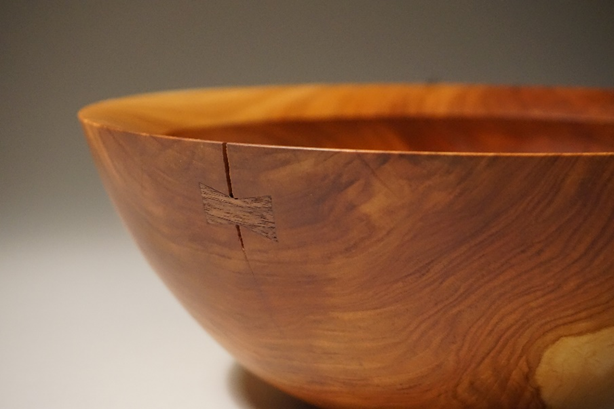
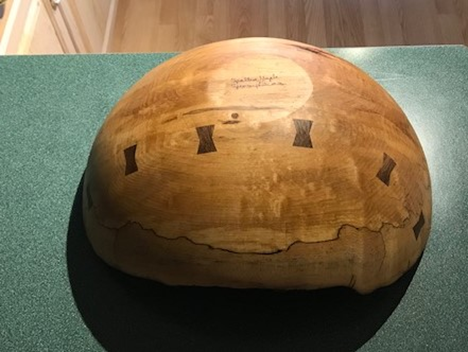
I was first drawn to consciously creating something with a “wabi sabi” aesthetic when I decided to repair cracks or inclusions in bowl blanks that had cracked during the drying process (I have plenty). It is such a shame – neigh, immoral – to toss out a perfectly good piece of wood that can do the job but has a flaw. I have made repairs out of necessity in the past when I repaired a crack after the fact that seemed attractive at the time, but this was the first time I set out to create a piece from the outset with the idea of including the repair as part of the story. At about the same time I stumbled upon a video about the Japanese art of Kintsugi, which is the art of repairing cracked or broken pottery with lacquers. Kintsugi is a perfect example of the core meaning of wabi sabi: a perhaps utilitarian piece that is broken and no longer useful, reborn as a beautifully restored and revered piece of art. As a result, I “borrowed” (stole?) the term as the title of my series of bowls repaired with dovetail patches. The idea of repairing turned items with dovetail patches (referred to as “pewa” by Hawaiian turners) is definitely not new to woodturning at large but is new to my process. Hence, my Kintsugi series.
The very first piece I repaired with dovetails came to me cracked almost into two pieces. I repaired it successfully (Whew!) and the owner now displays it upside down to show off the repair. Thinking back, this was the inspiration that caused me to start my Kintsugi series.
So, wabi sabi is new to me, but also not new to me. While doing my homework I learned some nuanced things about wabi sabi and have a reasonable understanding of the concept, but it seems that all my life, not conscious of any of that, I have been drawn to and instinctively found things “wabi sabi” appealing. I’ve loved my little hand-carved ivory Oriental gymnasts for as long as I can remember. The symmetrical, and expertly hand-woven, earthy First Nation baskets that my grandmother traded with her fine silk embroidery, are very special. The aforementioned steamer trunk always seems to offer up another new little surprise whenever I look closely. I built and live in a log house: There is a never-ending story told by the bug tracks, corked boot marks, huge randomly shaped logs tightly fitted to other huge randomly shaped logs, the startling cracks and snaps late at night (even after almost fifty years) and the cat face (large scar) intentionally placed in the front wall for all to see as they approach. The fact that it is the only log house alongside square and true framed houses speaks to both my wife’s and my individuality.
So now you know everything about wabi sabi. And hardly anything at all about wabi sabi. What I feel is important is to understand that a piece does not necessarily have to be flawlessly executed in form and finish to be artistic to convey a story. Just like a Teddy bear with an eye missing, something can be appealing and perhaps tell a greater story if it is imperfect or incomplete. Like a half blind Teddy bear, that piece can often be closer to you than you can adequately express.
For more information on Kintsugi, check out this video.
UPDATE: We have closed the on-line store. Not to worry you can still get our products by contacting us directly here.
Hi folks. I’m sorry to say that as of August 29, 2025 we will not be able to ship to the USA from our store. There will be a 35% tariff on all items we ship and we just can’t justify charging our customers that extra fee. Not to mention it’s a lot of paperwork.
As soon as the tariff or extra duty as some call it is lifted we will resume our shipments to the USA.
Sorry for the inconvenience. We hope to see a lot of you at the spinning and weaving events coming up this winter in the Lower Mainland.
Thank you for purchasing your Niddy Noddy from Ed Pretty-Wood Artist!
Your Niddy Noddy is made from Eastern maple for durability. The assembly hardware allows you to switch between sizes and also easily remove your skein. The design allows for easy storage and transportation when the niddy noddy is disassembled.
Included: cross heads (2), set of different lengths of main struts (3) and thumb screws (2).
Assembly
The “circumference” of each length of main strut are: Long – 76” (193 cm), Medium – 60” (152 cm), Short – 40” (101 cm)
After choosing the length of main strut required, insert the thumb screws through the cross heads then thread each one into the barrel nuts in the main strut. Tighten each one snugly, so that each crosshead can still be moved for adjustment.
Adjust the cross heads so that they are 90° to each other. Fully tighten the thumb screws when this is complete.
Removing your skein and disassembly
To remove your skein, simply remove the thumb screw on one end and slide the cross head off the end of the main strut, releasing the tension on the yarn.
Reassemble or store your niddy noddy as required.
If you are disassembling your niddy noddy for storage or transportation, be certain those pesky little thumb screws are threaded into the barrel nuts in one of the main struts to prevent loss. 😊
Ed Pretty’s tools are Canadian made in Langley, BC. He is a very skilled woodturner and has ventured into the world of Spinning Tools. There is more to come and we will be updating our new website as they become available.
Right now we have in stock Drop Spindles in a variety of sizes. We also have Supported Spindles, in a variety of sizes and woods. We, of course, have lap and table top cups to go with them. There are also much needed Ring Distaves and Nostepinnes. Our Nostepinnes come in a variety of sizes to fit all your needs. There are long and short handles and long and short shafts and combinations of all options. Coming soon will be Yarn Bowls, Niddy Noddys and Dizzes.
I’m just learning to spin myself and it is becoming a bit addictive. But that’s a good thing, keeps me out of trouble. There is so much to learn!
New to Spinning
Kim McKenna is an amazing spinner and a great teacher. She has been a huge help to both of us on our spinning journey. She was able to teach me and I was off to the races in only a couple lessons. Check out her website here.
Diana Twiss is another amazing spinner and great teacher. She has been instrumental in a lot of Ed’s designs with his spinning tools. Check out her Instagram page. She has some examples of Ed’s spinning tools in her pics.
Also be a good idea to check out this website. School of SweetGeorgia. There you will find a multitude of spinning, weaving, knitting and dying information and videos. Diana and Kim are both featured there as instructors.
Looking for fibre
If you’re looking for a fibre supplier. I strongly recommend Crafty Jak’s Boutique. Katrina is very skilled at dying a huge variety of fibre and her prices are very reasonable. I just love the colours and the combinations she comes up with.
Stay Tuned
Stay tuned and check back often. There will be some new products and a variety of new woods in the next run of Ed’s spinning tools.