
When we’re turning, all kinds of things happen that cause outcomes – both good and bad – that contribute to the final piece that we are creating. Understanding why those outcomes occur is what makes the difference between an enjoyable experience or, sadly, sometimes a stressful or even a frightening experience. Being aware of the direction of the force exerted on the tool by the rotating wood, how you control the force that you apply to the tool and generally considering the various things that impact the path of the tool is the key to getting the result you are working toward. Various “occurrences” at the lathe may seem like a mystery but in some cases, you may already be aware of the contributing factors, just not some of the connective tissue. Have you ever found yourself clenching, knowing that you are about to get a catch, for instance? You know it’s coming but you don’t know why. You just haven’t connected the dots yet. Let’s try to put those dots together in an understandable way.
I apologize in advance for the long read but there was a tremendous amount of information packed into my demo. Since “showing” is essentially pictures, and each picture is worth a thousand words…
Catches
It’s fair to say that the fear of getting a catch is the largest cause of stress and therefore hesitation and uncertainty in woodturning. If you understand what causes a catch, you are 95% of the way to preventing them. There are two – only two – causes of catches.
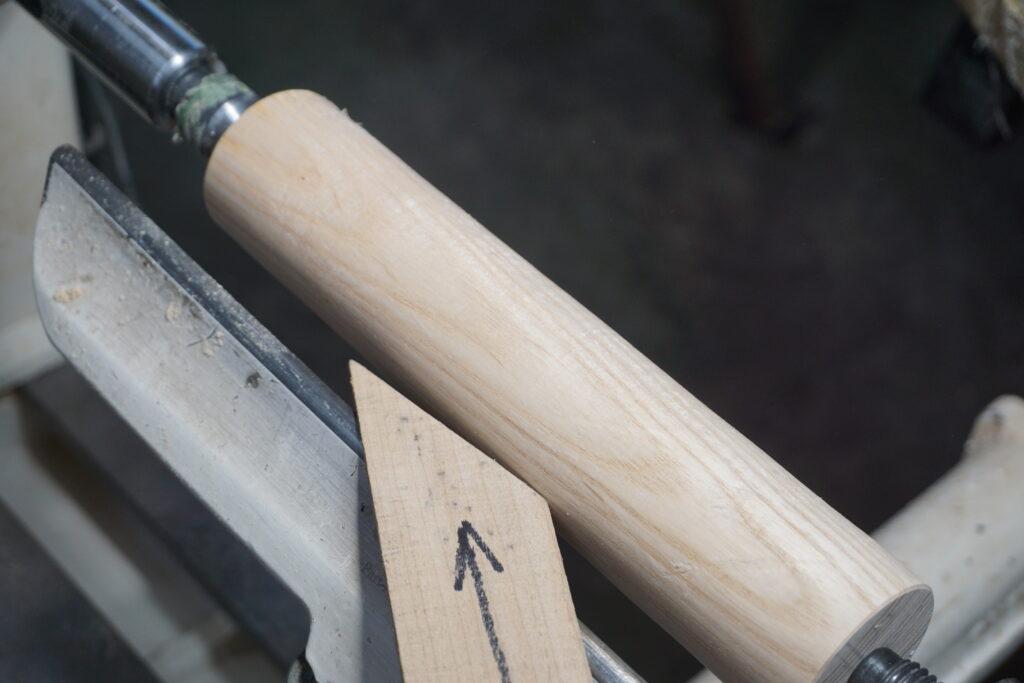
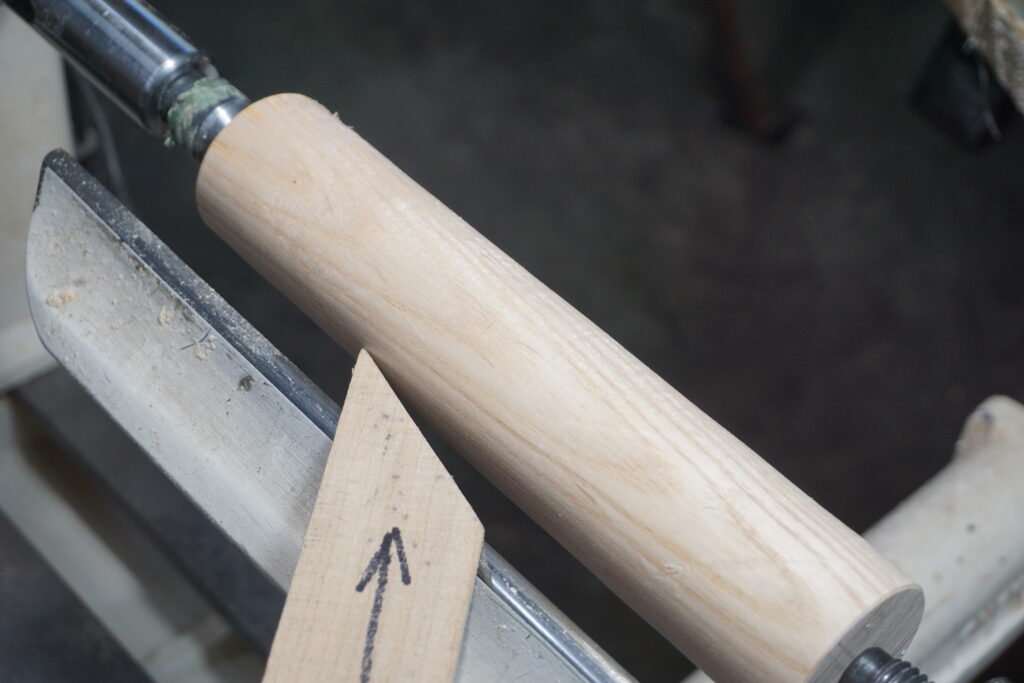
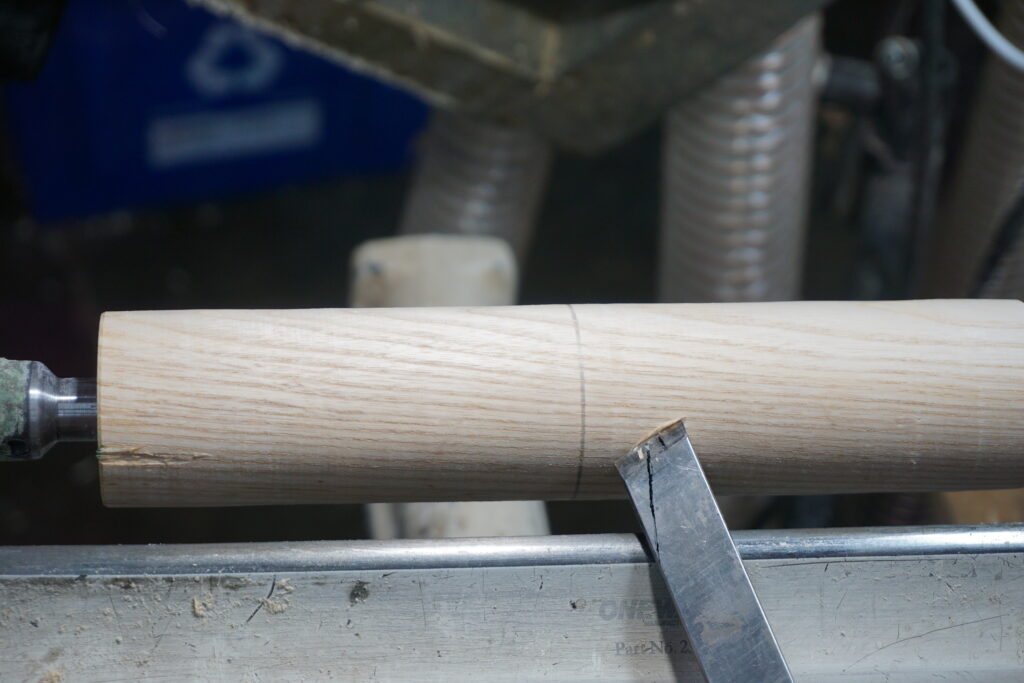
The first occurs when addressing the wood with the cutting edge first (see photo 1). This can be intentional or by accident. We know the tool wants to go in the direction the bevel is pointing. In this case it’s pointing into the wood so that’s where is goes – with varying intensity. The solution is to address the wood with the heel of the bevel (see photo 2) then use that as a fulcrum to close the cutting edge onto the wood. When you approach the wood with the tool, don’t try to “nail it”. Emphasize the placement of the heel on the wood.
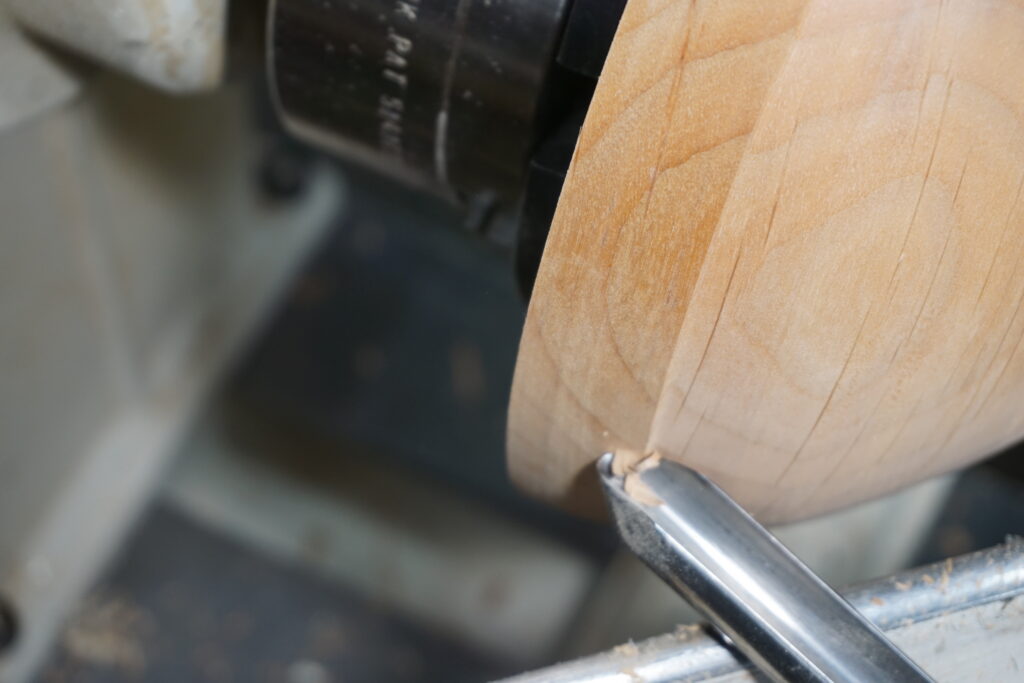
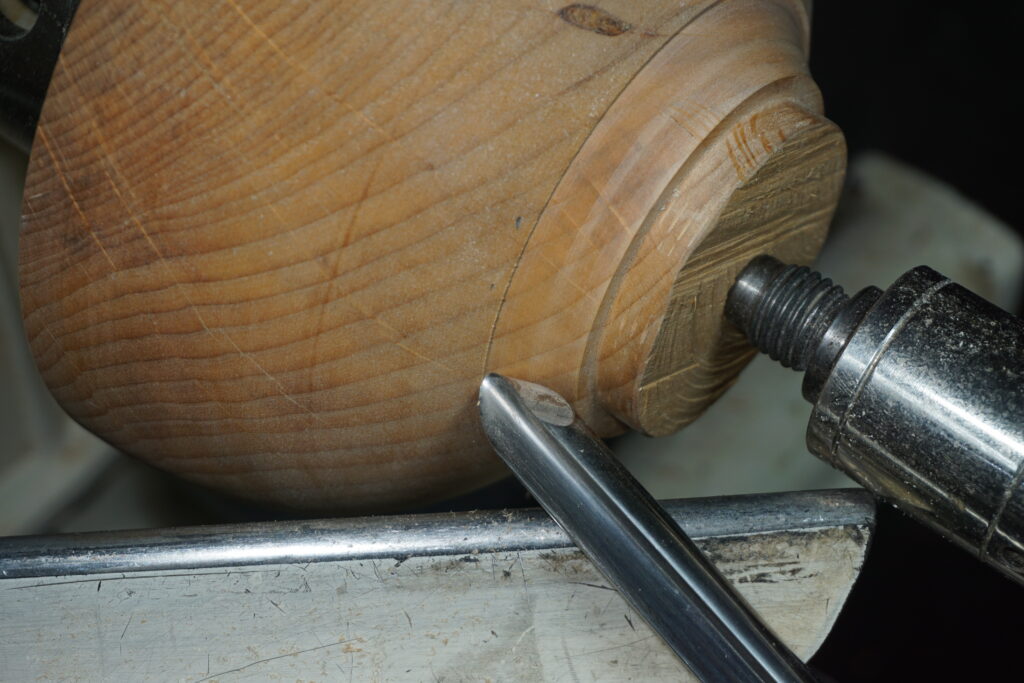
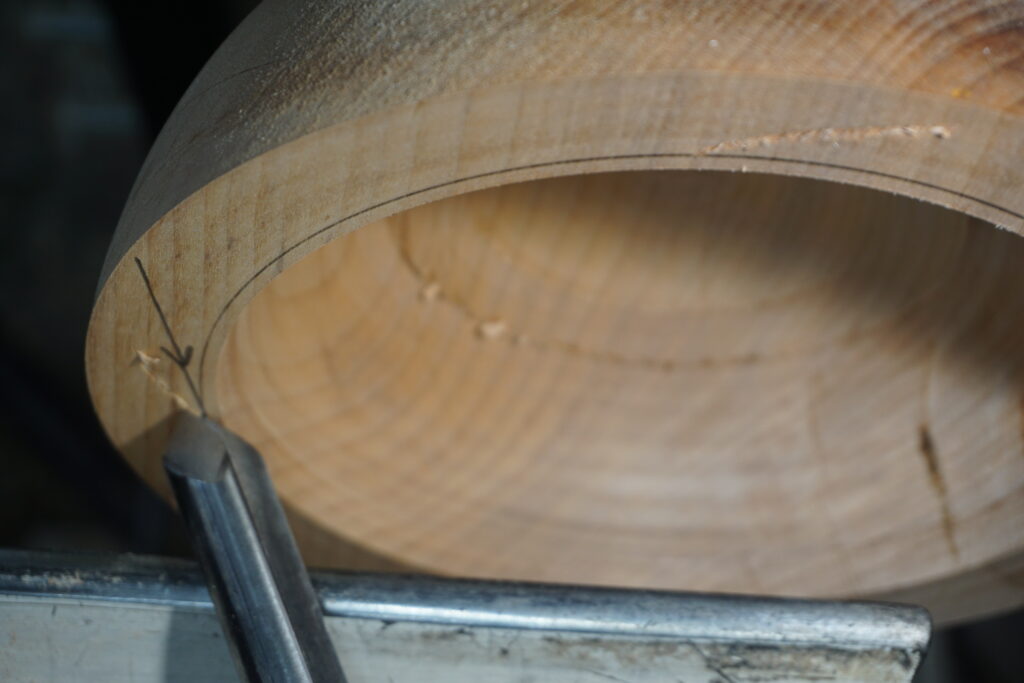
The second – and the least understood – is when the “support point” (contact point of the tool on rest) and the “load point” (cutting edge on the wood) are not in line with the rotational force at the point of contact. That force is essentially vertical when cutting at the 9 o’clock position (just above center when turning a bowl) on the wood. On a tool with a round shank (i.e. bowl gouge), this can cause a rotational force on the tool resulting in the cutting edge digging in progressively deeper as the wood rotates. In photo 3 you can see that the downward force (chip on the cutting edge) is not in line with the support point (bottom of the tool on the rest), so will roll the tool into the wood. This is also an issue with a skew since it is resting on one corner on the tool rest. On a bowl gouge, the indicator is the cutting point on the bowl gouge is moving from the “bottom” of the flute to the “side” or the wing on a bowl gouge (when the tool is held roughly in a horizontal cutting position). On the skew, if the cut occurs at about the middle third, life is good (see photo 4 showing the support in line with the force). If it moves toward the long point of the skew, life is about to become bad (see photo 5). In my book, a bowl gouge catch makes a skew catch look like child’s play, probably because it grabs a bigger chunk of the pie.
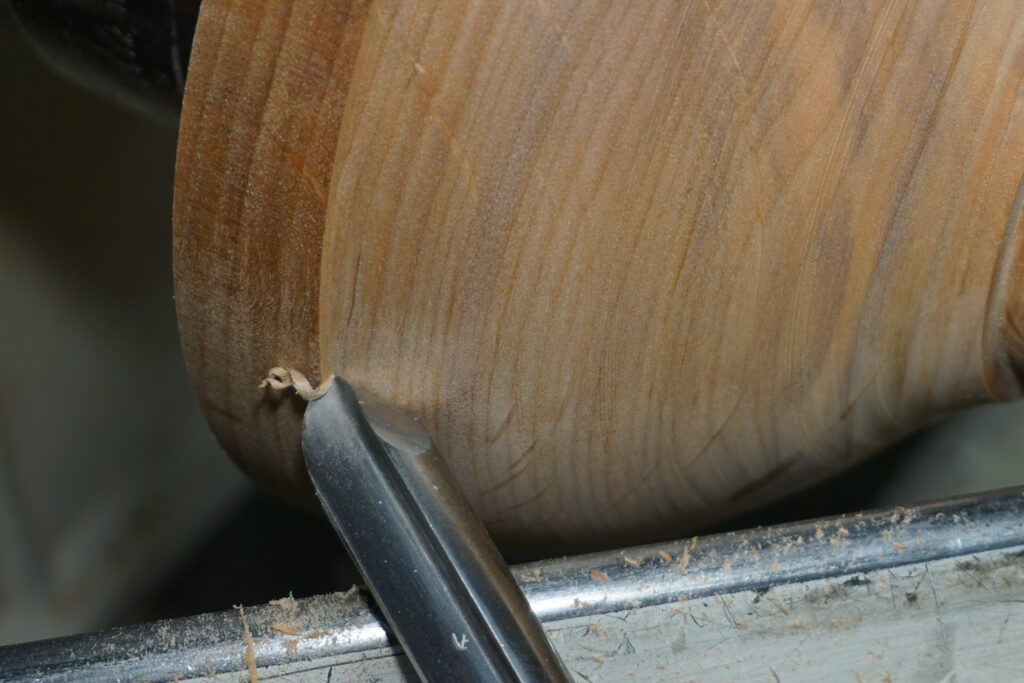
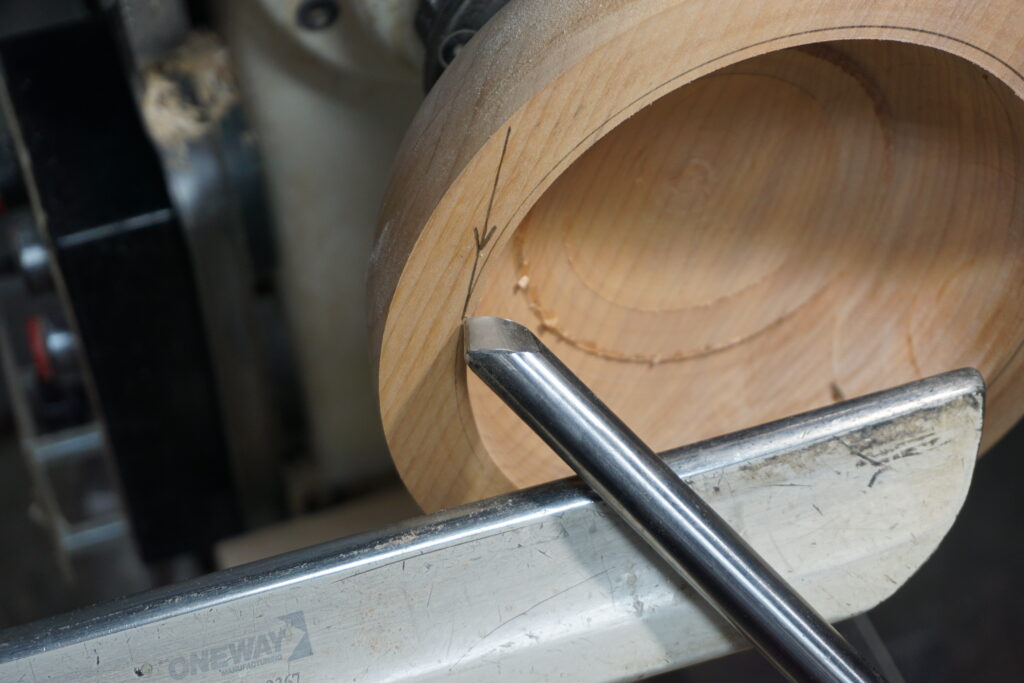
To prevent the classic catch on the outside of the bowl about 7/8 of the way toward the rim, keep the flute open at about 45 degrees all the way around the bowl (see photos 6 and 7). This keeps the load point and support point in line with the downward force. For folks who simply stand at the lathe without using their legs and body to drive the cut, the only way of keeping the bevel in contact is to roll the tool open. When the tool becomes close to being wide open (looking straight down into the maw of the flute) the cut is happening on the side of the wing and disaster is about to strike (see photo 8). The answer is to move your body to keep that gouge open to no more than 45 degrees. More about that further on.

While on the Subject of Catches
Since we’re talking about the rotational force of the work exerting a downward force on the tool, let’s talk about entering a cut on the face of the work (we’re talking bowls here but it’s the same in spindle turning when using a gouge to cut a cove). When turning at about center, the rotational force is basically vertical at the point of contact with the face. If the very tip of the tool is at an angle with that force, the tool will tend to run in that direction. If the tool is vertical and in line with the force, it will remain stable (see photos 9 and 10). If leaning toward center it will go toward center, if leaning toward the outside it will go toward the outside (see photo 11). The farther you are from center, the greater the force. Understanding this, you will never again ruin the rim on your almost-complete bowl. If the tops of the flute are vertical (100% closed), the tip is in line with the rotational force, and the tool will remain stable.

To further enhance your control
Pushing the tool forward to start any cut offers no control because you have no “brakes”. You generally don’t have a lot of control over the speed of entry. To have control over the “speed of entry” and also have “brakes”, lower the tool into the work rather than pushing the tool into the work. To do this, lower the back of the tool significantly, place it very near the surface of the work, anchor the tool on the rest then slowly raise the back of the tool. The tip will move closer and enter the wood very slowly because you have greater control over how fast you raise the tool over a significantly longer distance. You can also stop lifting at any time, therefore you have “brakes”. This meethod will also buy you a lot of “fudge factor” if your tool isn’t placed exactly correctly because it will cut its way into the wood rather than shocking it. Personally, over time, this has become the way I start every cut.
Your hands have different jobs
At a normal lathe (without a rotating headstock) when turning a bowl, your left hand is typically forward and your right hand is back. The power from your legs to drive the tool forward should come through your back hand driving the tool forward. The front hand’s job is to steady the tool and absorb the vibration. The added advantage is that the forward thrust along the centerline of the tool aids in keeping the tool nicely registered on the wood. Using the forward hand to power the tool tends to relieve that pressure causing chatter or even steering the tool out of the cut.
To do this, it’s wise to hold the tool with your left hand in such a way that it’s impossible to pull the tool. I usually pinch the tool (because you have to pull the tool to enter a cut: see below) with my thumb and forefinger then morph that into a position where they are simply resting on the wings of the flute. If your fingers are “behind” the tool, it’s almost a certainty that you will pull the tool (see photo 12). Experiment in air off the rest. If your grip is such that you can pull the tool, then you will do that on the work. Try to find a grip that works for you.
Of course there is always an exception. To drive the tool forward with the back hand requires that the tool is on the wood so that the bevel can direct the tool forward. When you are off the wood at the start of a cut, of course you need to engage the rest with your forward hand then draw the tool into the wood with that hand. Once the bevel is on the wood, simply roll your hand away from the rest and carry on.
This is valuable information for left handers because the natural thing is to power your tool with the dominant (forward) hand. Not doing this is difficult I am sure, but at least knowing there is an issue is a start. Most left-handers have adapted to many things in this right-handed world so sometimes it’s not so difficult. If it is a significant problem, an alternative is to get a lathe with a rotating headstock or a sliding headstock to work off the end of the lathe. This will allow you to place your right hand forward and your left hand at the back where it can do the most good.
A common left-handed (left back/right forward) cut is when making a seriously heavy cut on the outside of a bowl. In this case you are using both hands to drive the tool into the cut and forward. It’s a viable technique but not typically used when making most cuts.
If you’re a spindle turner (Yay!), handedness is a non-issue. It’s only those needy bowl turners who have to deal with this. (I hope you know I’m kidding).
It’s a tool rest, not a tool guide
I see many turners engaging the tool with their forward hand at all times. So much so, that they may have to be surgically removed. I believe this comes from the aforementioned uncertainty which is probably from experiencing some pretty scary catches.
Clearly there are times when you need to engage the tool rest with your forward hand – but there are also times when doing so is a huge impediment. So how do we decide? The cutting edge always needs support, so: a.) When the cutting edge does not have support from the wood, engage the rest with your forward hand. b.) When the cutting edge does have support from the wood, do not engage the tool rest with your hand. What this boils down to is “trust the bevel” to get the tool to go where you want it to go. In reality, it’s more like “trust yourself”. We all understand that the bevel controls the direction of the cut, so let it do its job.
By engaging the tool rest with your front hand while making a cut, a couple counterproductive things happen. First, the power provided by the back hand is often reduced or negated by dissipating that force into the tool rest instead of the wood. This is a common cause of chatter. Secondly, if the hand is engaging the rest, you have to devise some alternative method of “getting around the corner” on the outside of a bowl. The same thing happens if your hand is hanging down and eventually runs into the tool rest.
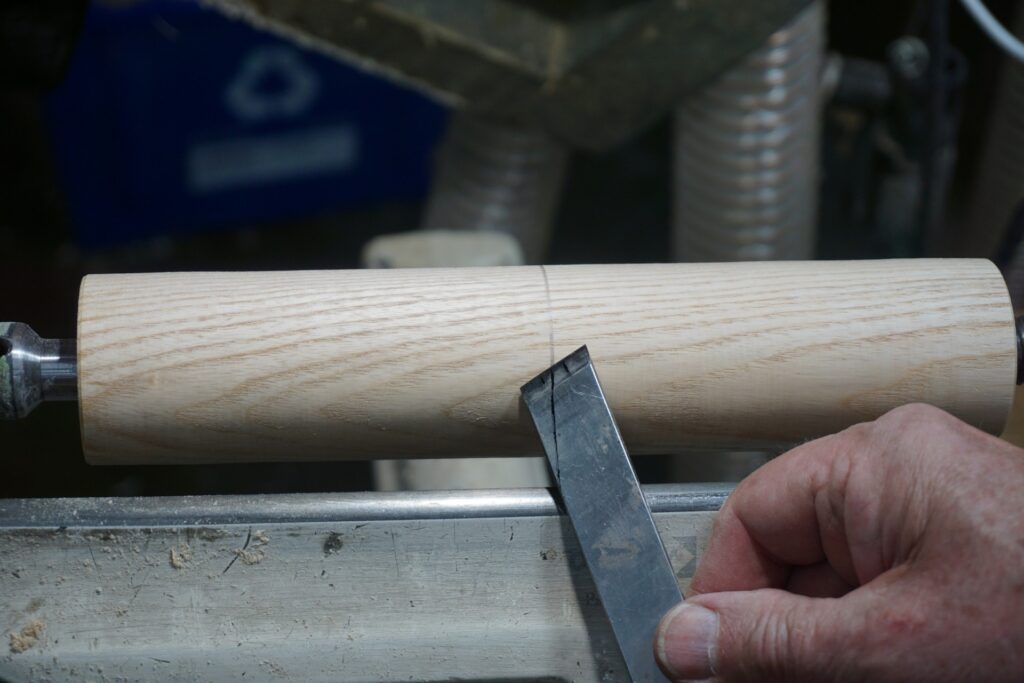
I have heard people say to use the tool rest to make a straight cut. That works only if, a.) you set is correctly and b.) it’s a straight cut. What do you do if it’s a taper or there is a curve involved? I can’t say it enough: Trust The Bevel! I produce straight rollers for a customer and have developed an effective way of making a straight, axial cut. They have to be within 0.015” (1/64”) on each end. Size your piece at both ends (and the middle if a long cut), start making your cut from one end but aim the bevel high (make the diameter progressively larger and larger). With each successive cut, aim the bevel lower and lower until you reach the desired diameter at the other end. Remember to use your whole body to power the tool. Standing soldier-like will not get the job done.
Opening the Flute
From my experience with years with students, right out of the gate, about 50% naturally do this operation correctly and 50% incorrectly. I watch and if they do it correctly, I reference it later for the record. The other half I deal with it right away. You will be in one of these groups.
This seems insignificant but it makes enough difference at the start of the cut that if you roll the tool open incorrectly, you end up with a vase instead of a platter.
Imagine there is a wire running through the center line of the tool. Rotate the tool around that axis. While opening the flute causes some altering in the position of the contact point of the bevel (ultimately, the direction it’s going to go), the “wrist up/wrist down” (or forearm up/forearm down) motion keeps that change to a minimum.
A “hand up/hand down” motion while the forearm remains fixed produces greater a swinging/sweeping motion at the tip causing significantly more of a change in bevel angle to the wood. This often makes a huge change in the direction at the very start of the cut resulting in difficulty achieving the desired form.
To visualize what I just described as the correct motion, loosely grip the tailstock quill. Rotate your hand up and down as if opening the flute on a gouge and you will see that the hand rotates around the centerline while the wrist and forearm move up and down.
One nice plus when doing this is to let your forward hand come up with the tool as you open the flute. This will lift your paw above the tool rest so it won’t get in the way when “going around the corner”.
Using your whole body while turning, not just your arms and hands
Under “Catches”, I noted that the “open flute” catch is a result of standing soldier-like at the lathe and trying to turn the outside of the bowl form without using your legs. This is the solution.
When you have to travel any distance (all bowl cuts and long barrel shapes in spindle turning), you will find you need to use your whole body more than just your arms.
Making a forward cut with locked knees can only be done by rotating your upper body at some point which results in the cutting edge making an arcing path centered around your body core. This results in unwanted form, chatters or constantly coming out of the cut. Or all of the above.
Foot placement should be so that your weight is almost entirely on the right foot at the start of the cut and almost entirely on the left foot at the end of the cut. Your cut, then, is simply a transfer of weight from right foot to left foot. Your cut has ended when your left knee is over your left toe. Any further and you will be off balance and in danger of really messing up the form. Everyone learns differently so occasionally I have suggested “just move your left knee forward” and that gets things coming together.
Bend your knees to the point that you feel your quad muscles (more the right at the start of a cut) support the weight of your body, point your right toe slightly in the direction of the cut so that your ankle and knee will work together. Push yourself into the cut from the ball of your right foot, transferring your weight steadily to the left foot. As the cut progresses, you should feel your weight transfer to your left foot. Rotating your upper body at the hips changes the angle of the bevel to the wood, which in turn creates the desired form as it moves forward in the cut.
During this whole exercise, it really helps to firm up your core, making your whole upper body one unit.
Never take a step with your left foot during the cut. Instead, stop the cut and reposition. Making a “fake cut” prior to a cut to see if your left foot can be moved slightly to get a longer cut is a good practice. If you can’t make the whole cut, acknowledge that and make two cuts.
Using your quad muscles (legs) rather than your smaller arm muscles results in far more control, plus the ability to make a super-slow (meaning super-controled) cut, yet under full power. You won’t get nearly as tired, either.
A good rule of thumb for foot placement when turning the outside of a bowl (doesn’t work on the inside) is roughly parallel to the tool rest. Parallel to the lathe when making in-line cuts, 90° fore and aft to the lathe when making crosscuts (facing) and about 45° when making curved cuts.
To illustrate the power and control that you have when using your large quad muscles, picture yourself at a door with a heavy spring closer. Brace yourself and try to open the door smoothly using just your right arm (back hand when turning). Likely the effort will result in an initial lunge and then smooth movement. Now try putting your shoulder against the door and using your legs to power it open. You will find you can open it smoothly and as slowly as you want. If, when you are turning, your cuts have a lunge-lunge-lunge motion, you’re using only arm power. Your tool is probably dull, too 😊.
Where do you look when making a cut?
I’ve been turning for over 65 years and I still can’t take my eyes off the shavings coming off the tool – it’s just so cool – so I understand the urge to watch those shavings. But when it comes to the “money shot”, my eyes are on the horizon on the top of the bowl on the outside and the opposite side of the cut on the inside. But where on the horizon? If you watch the “step” of the cut only that’s not much different than watching the shavings. You need to see the big picture, essentially extrapolating the curve, trying to determine if it’s heading where you want it to go. Look ahead of the cut, just like looking across a curve when driving. This may sound difficult, but it becomes surprisingly natural very quickly. Just like driving a car: look where you want to go.
Thoughts on scraping (above and below center)
I was initially taught to scrape on center. Smack-dab on center, not higher, not lower. Both inside and out. After several years of getting scraper catches, I decided to figure it out for myself. Basically, it’s all about “where will the tool go if it digs in”? Follow the logic:
- When scraping on the outside of a form, stay at center (good) or slightly below (better). In the event of a catch the tool will swing into air, away from the wood.
- When scraping the inside of a form, stay above center so that in the event of a catch the tool will, again, swing into air, away from the wood.
- When doing the “bottom” of the inside, clearly you need to get to center on occasion. Unless you are working with a very vase-like form, if the tool digs in there is no wood below to cause a problem.
Upward sweep.
Rather than maintaining a 9 o’clock position throughout your inside cut, try sweeping upward through most of the cut then arcing down to center. This produces an acute shear angle to the wood (read: cuts way nicer). Generally, sweep upward through what you would consider the “side” of the bowl and arcing down in what you would consider the “bottom” of the bowl. This creates a cut with greater shear (evident from the nicer shavings), makes a cleaner cut and I feel it helps the cutting edge last longer. Way less effort, too.
Pull cut – bevel on the wood
What most turners consider a pull cut with the tool held horizontally is not a controlled cut, because the bevel is not on the wood. It is a peeling cut, useful in removing large amounts of wood that you don’t want, however there is not the level of control needed when refining a form. When the tool is held horizontally, the only way to not get a severe catch is to partially open the flute enough to get that peeling cut but not so far as to be scraping. Allowing the bevel to contact the wood in this case is a guaranteed catch (and a whopper at that).
Because you are using the wing (side) of the cutting edge, the only way to make a pull cut with bevel control is to align the tool with the direction of the rotational force at the point of contact. This usually means an almost vertical position of the tool with the handle pointing toward the floor. In this way the load point and support point are in line with the force, causing no rotational action in the tool. As always, engage the heel of the bevel, close the gap to the cutting edge then proceed with the cut.
Parting thoughts
As in most things, there is always more than one way to skin a cat, so different techniques than I have described may achieve the same result as long as you are considering all the forces. What I am trying to describe is the dynamics that affect the tool on the wood. As long as you understand that, it is possible to achieve a result in a variety of ways.
There are exceptions to every “rule”. Also, if you know and understand a rule, you will know how and when you can break or bend it. You will develop ways to get around problems by understanding what causes things to happen – or not happen – as the case may be. That takes time standing at the lathe. So go out and turn as often as you can, always experiment and ask yourself, “Why did/didn’t that happen?”
Don’t forget the one thing I mentioned during the demo: everything in woodturning is “Goldie Locks”. Not too hard, not too soft, not too fast, not too slow, etc., etc. So much about woodturning has to be “just right” and that feeling comes with time. But take heart, it isn’t always a long time. Just the right amount of time 😊.
Understand that practice does not make perfect; it makes permanent. If you continue practicing something that doesn’t give you a desirable result, that is what will become permanent. My feeling is that in our case, frequency trumps intensity. In other words more often is better than long sessions.