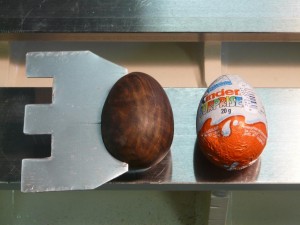
I won’t say what the surprise is going to be because the recipient might read this. All I’ll say is that the request came from someone wanting to have a turned box shaped like an egg to hold a very special gift. The egg will be wrapped in a Kinder Surpise wrapper so the box had to be the same shape and size as a Kinder Surprise egg for the wrapper to fit.
Getting the profile exact was a matter of cutting a pattern out of paper that fit the egg, then transferring that to a piece of aluminum sheet to use as a profile gauge. There was a bit of trial and error involved but I finally got a pattern that worked. The specifications included a wall thickness of 1/8″ or less so I considered a profile gauge for the inside but decided I would try the freehand route first. In the end that was satisfactory, having to turn 5 practice pieces in all.
I turned a couple out of scrap wood to refine the procedure and the cuts then moved on to more decent material. One was a washout shape-wise, two were turned from maple burl which ended up with surprise bark inclusions in the wrong places. The final one – the charm – was turned from some figured black walnut. That was cool because another of the requirements was that it should look like chocolate.
The procedure was basic box turning with a rabetted joint. I sized the blank between centers to about a .025″ larger diameter than the finished piece, then used a parting tool to cut the rabbet about 1/16″ (half the wall thickness) smaller than the finished diameter. A thin parting tool was used to part the two halves, leaving a tiny portion on the female side to indicate the inside diameter of the rabbet and the rabbet itself on the other side. I mounted both pieces seperately in a chuck to hollow them out, using a vernier caliper to measure the depth but approximating the inside shape by feel. The male side was turned first so that it could be used as a gauge for the female side. Once the other side was hollowed and the fit was satisfactory I remounted them together between centers to turn the final shape. The profile gauge was made to fit a blank with a 1/2″ tenon on both ends and the joint was marked on the profile gauge as well (see photo). Lining the gauge up with the joint, the ends of the egg were marked and a parting tool used to cut the 1/2″ tenons. After turning to the finished diameter and roughing the shape, the final shape could be refined until the gauge rested on the tenons. After sanding, the tenons were reduced and the waste cut off with a saw. Hand carving and sanding the nubs finished the piece.
I have turned a few eggs and a few boxes in my time but this is the first box shaped like an egg. It was fun and didn’t take too long at all. The burl eggs will stay in my office so they weren’t a waste even though I won’t be able to wrap them with Kinder Surprise foil wrappers.
As always, I encourage your comments and questions, so please refer to the tag line at the bottom of the article to post a comment.

