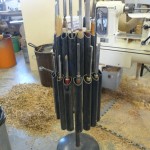
At one time my lathe was against a wall so storing my tools was a simple matter of providing a rack on the wall. When I got serious about turning I moved things around to get the lathe out in the middle of the shop. A wonderful thing at cleanup time but where to keep my tools? I decided to make a self-supporting carousel that I could easily move when required. It doesn’t collect shavings and tends to keep me organized because it is easy to use and close at hand. I chose to configure the carousel in two tiers because the number of tools I have would make a very large and ungainly unit that would be quite unstable. This one is quite compact and still has room for more tools on the bottom tier.
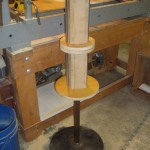
I’ve included some photos that I think are pretty self explanitory. The top tier holds spindle turning tools and bottom tier holds bowl turning tools. The top tier is a bit un-nerving with all those sharp spears waiting to take an eye out (yes, I listened to my mother) so I keep a bucket over them when not in use to keep from gouging myself – literally. Reaching across rather then turning the carousel can be a bit scary but I cured myself of that. The base is an old harrow disk so is very stable, easy to sweep around (tapered to nothing at the edges) and rolls along simply by slightly tilting the whole affair with the thrust bearing letting it roll to another location.
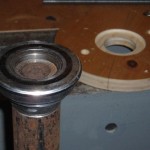
The bearing is a somewhat complicated affair used only because I had a thrust bearing and a metal lathe to adapt it. A far easier method for most (and me if I wasn’t so stubborn) would be to use a Lazy Susan bearing. Obviously the base can be anything one wants (maybe even a small cabinet) with wheels to make it easy to move around.
The sizing of the plywood circles for the top tier was critical and a little hard to calculate exactly without calculus because the ABS sleeves don’t contact each other at exactly 180 degrees. I did fine with a bit of ordinary math, guestimation and flex in the ABS, but the key was to keep the top tier tight to support one another. You will note the top two plates are the same diameter. The top plate of the lower tier is also that diameter because the lower sleeves fasten outside of the upper sleeves. The lower plate of the lower tier reflects the larger diameter of the second tier. You will also note that because the sleeves on the bottom tier don’t touch each other, two different diameters can be used for the sleeves, accomodating the larger handles on some bowl gouges. The bottom screws holding the sleeves to the plywood double as bottom stops in most cases. For shorter tools I simply put a screw through the sleeve at the appropriate length. All bottom stops have a piece of rubber fuel line over the screw to provide a bit of cushion for the tool handle. The top screw is easily accessed because the tops are cut at an angle which also aids in removing and replacing the tool. If a sleeve is holding a longer tool requiring a stop lower down, the bottom screw securing it to the plate is accessed through a larger hole on the outside. The killer ready-rod I used, like the bearing, was some I had on hand. If assembling yours in this way, I am sure 1/4″ or 5/16″ would be fine. In my case everything hung from the top plate requiring something to hold everything together in tension. If you use a Lazy Susan bearing you won’t need it because everything will be in compression so you can simply screw everything together.
If I were to do anything different I might raise the whole unit a bit so that the top tools weren’t staring me straight in the eye, although I would still keep the bucket over them just in case. It hasn’t been enough of a concern to make me change it now that it’s made, but clearly that height is significant to each user.
As always, I encourage your comments and questions, so please refer to the tag line at the bottom of the article to post a comment.


![photos for articles 008 [1600x1200]](https://edswoodturning.com/wp-content/uploads/2010/12/photos-for-articles-008-1600x1200-150x150.jpg)
Just came across your web page as I was searching for info on Douglas Fisher and you popped up. Thank you for chronicling the visit by Douglas, I took his day seminar with the Grey Bruce Woodturners Guild here in Ontario. Since Douglas’ class I have done some pieces with the off axis and off center turning, but I wanted to revisit the process and you have done a really nice piece on that. From there I started browsing on the site and came here, I have a rolling cart with my tools on it. The issue for me is that with shavings(and I have plenty) on the floor this cart gets difficult to move to where I want it. Thanks for sharing this simple carousel. Dirk Hoogendoorn