
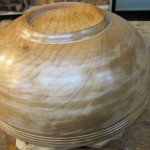
Note the orientation of the flawed finish to the direction of rotation.
A few days ago I got an email from a friend wondering what had caused some blotchy marks on his bowl. He wasn’t sure if it was the wood or the material he used for the finish. Upon seeing the photos I knew immediately that the problem was neither. The problem was with surface preparation. There are areas where the wood looks clean and the finish is very nice, however there were cloudy, white areas arranged in rings or layers relative to the direction of rotation. The immediate clues are the evident sanding scratches in the white areas. The white areas are torn end grain that has not been sanded off, allowing air to be trapped under the finish. If you look closely you will see that the white areas are in the end grain, right where tear-out occurs. He had applied sanding sealer in his process making the problem even worse. He was wondering at what stage to apply that product, which I also comment on in my email response.
Always be ultra observant when checking your surface prior to applying a finish. The slightest flaw will be magnified tremendously and all your work and a beautiful piece of wood could be ruined. Following is my email in response to his query. Hopefully there is some information in there somewhere that that may be of some value.

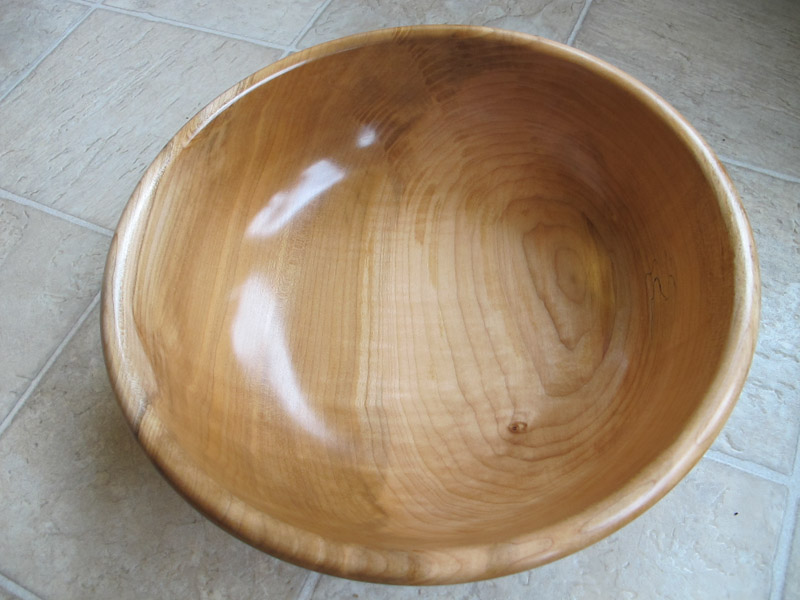
Interior of bowl showing flaws in end grain areas.
“Dave, those are definitely tool marks. More specifically, they look like sanding marks. Do you hand sand while the lathe is running? That would explain the concentric rings. When sanding while the lathe is running it’s necessary to use either a random orbital sander or a self-driven rotary sander. A rotary sander powered by a drill works well also but sometimes is tough to get inside small bowls. That avoids the concentric rings because the sanding action crosses the the direction of rotation. In general, when sanding you try to sand at slight angles to the previous grit, even on flat work where you’re sanding with the grain. That way the ridges are knocked off by the next grit. If you continually sand in one direction, marks never get sanded off and can even be magnified. I prefer a low lathe speed and a bit higher sanding speed with a random orbital. Reaction sanders work well but you have to bring the lathe rpm up a bit to get the sanding disc rotating at a reasonable speed. The center area still has to be hand sanded. An alternative is to hand sand with the work rotating on the lathe then hand sand with the lathe off, being careful to sand across the concentric sanding rings to sand them off. Sometimes hand sanding is the only way you can get rid of tear out. I’ve frozen my thumb in what seems a permanent bend working spots of tear-out. Rather than sanding the whole bowl, simply concentrate on the tear out, blending it in to the rest of the curve (hand or powered). Remember of course to go up in stages no more the 50% of the previous grit. i.e. 80, 120, 180 and so on. The poorly sanded areas may also be an indication of dull sandpaper. Always be sure you us sandpaper like somebody else bought it. 🙂
I try to finish-turn to a point where I can start with 120. That’s my goal – I don’t always make it. 🙁 I power sand with a 3″ random orbital to 320 then start with 320 by hand and continue on up – usually to 1000. Not to worry, each grit gets faster and faster. Three twenty shows up all the sins so really check things out at that point. Often I have to go back to 120 in spots and carry on from there. After 320, look at your work critically for spots like the ones in the photos. One way to pick them up is to spray it with water. The bad spots will stand out the first few moments when it’s wet. Unless I’m applying layers of dye and sanding between colours I always wet the piece after the last grit, let it dry then sand it again with that grit, hitting the wood at a bias to the grain to knock off the fuzzies that stand up.
As far as sanding sealer goes, I don’t use it that often because I can’t colour the wood because sanding sealer wouldn’t allow the dye to penetrate. When you use sanding sealer it’s after the last grit and then re sand after application, before continuing with your finish. It does the same thing as the water – it stands the fuzzies up so they can get knocked off – but of course it also seals the wood. If you want to “pop” the grain, sanding sealer is not the way to go. It dries so fast that is stays on the surface. To emphasize the grain a finish must penetrate the grain to allow the end grain bits to absorb more than the flat grain bits. In that case an oil base product is the way to go – like Wipe on Poly, Tung and others.
Sometimes finishes “go off” in the can over time. If that’s obvious (clumpy) then no problem. Sometimes it still looks fine because the change is so slow. In that case, Wipe on Poly won’t cure properly so stays tacky in some spots. Finish that has “gone off” can make the surface appear blotchy as well, but that’s not your problem here, just GIO. I decant my finishes into smaller bottles so when it goes off I don’t toss as much.
The solution to your dilemma? If you have sanding sealer on it, strip it with lacquer thinner then re sand the piece with one of the alternatives noted earlier. I’m afraid that hand sanding may be the way to go. If elbow grease isn’t to your liking, paint may be an option. 🙂 “
There was a time when I rushed my work after I was finished turning. The fun part was over but the sanding and finishing was just a drudge. I eventually learned that there was no joy in what I was doing because the end product… sucked. Take the time to sand your work to perfection. This alone will inspire you to use sharp tools and better tool control. 🙂 Learn to be a good finisher as well as a good turner. You will be far happier with your effort in the end.
Remember: “Good enough, isn’t”
Well, here’s an update.
After all the back and forth, Dave decided to bite the bullet and remove the original finish, re-sand the bowl by hand and finish it again as discussed in the email above. As you can see from the photos it was well worth the effort. I think it looks awesome. Now you an even see some figure in the wood.

All’s well that ends well. Remember, you only get out what you put in.