
Originally written for Craftsy’s by Ed under the title: “Sharpening Woodturning Tools Properly Changes Everything”
So many people attempt woodturning and struggle with it or give up altogether. Others have stuck with it faithfully, trying to advance but stayed at a frustratingly low level of achievement. Properly sharpened tools will change that. Even if you are an experienced woodworker, sharpening woodturning tools is counter-intuitive to sharpening flat woodworking tools. Understanding the difference makes your woodturning experience enjoyable rather than frustrating.
Bench chisels and turning chisels are two different animals
Bench tools use either the flat side of the tool (i.e. bench chisels) or the tool surface (i.e. planes) for reference for guiding and depth of cut. To control the cut effectively, the reference surface must rest against the wood. Imagine, for a moment, a plane with the iron out even just a fraction too far and you have the idea of an uncontrolled cut.
When using a turning tool, the bevel of the tool rests against the work and is therefore the reference surface used to guide the direction and depth of cut. Most woodworkers are familiar with honing a secondary bevel on a cutting tool to make it sharper by tilting the hone off the bevel by a couple degrees. This makes an ultra-sharp edge that is also stronger because of the steeper angle. There is no change to the reference surface in this case. Because the bevel is the reference surface on a turning tool, honing only the edge eliminates the bevel as a control surface. Having no control surface produces the “catches” that scares the willies out of turners and at the same time prevents them from getting the shapes that they want.
Highlights of a properly sharpened turning tool
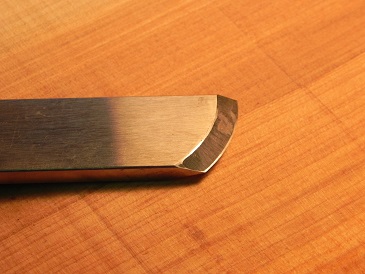
The top photo shows the features of a properly sharpened skew. This skew has a clean grind from cutting edge (tip) to the end of the grind (heel) and a hollow or concave grind, providing a control surface from tip to heel. Note the hone marks on both the tip and heel. If honing is required, equal pressure is applied to the tip and heel at the same time, maintaining the line through the two points leaving the reference surface intact.
Note: Honing is required on a skew. (See below)
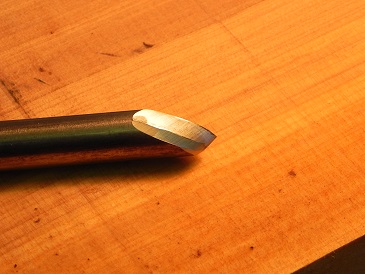
The photo above shows not only a proper hollow ground bevel, but a second bevel further down to reduce the width of the main bevel as well as a rounded heel. On this bowl gouge, the reduced width of the cutting bevel provides more maneuverability on inside curves and the rounded heel prevents bruising of the wood, however the cutting bevel is still wide enough for control. Note the hone lines are still on the tip and heel of the cutting bevel.
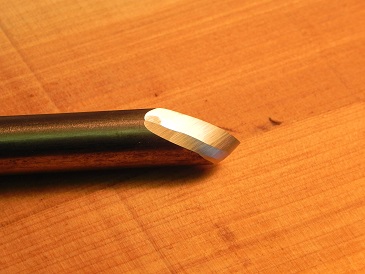
This photo shows an edge straight off the grinder. This is acceptable in all turning tools except a skew. Because both bevels on a skew are reference surfaces, the burr from the grinder must be honed away on both sides.
Sharpen accurately, quickly and often
The style of grind on the bowl gouge above is referred to as an “Irish” or “swept back” grind, making it a very versatile tool. It is also a very complex grind, which is extremely difficult to produce freehand. Almost impossible for a novice without grinding off ½” of tool each time.
So how do you get the sweet, clean, consistent bevels on the tools pictured above?
First, buy a good grinder (1725 rpm maximum) with a “blue stone” (gray burns tools) available through retailers dedicated to turning supplies, online or otherwise. There are various wheels available. The CBN wheels I use are about $200 each but worth every penny and pay for themselves due to their long life.
Next, buy one of several grinding jigs dedicated to turning tools available at the same retailers. The price of the grinder and jig will be more than offset by the tools that you don’t grind away because you remove practically no material each time at the grinder. Bonus points for having the same exact grind every time. I guarantee your turning experience will be enhanced a thousand-fold because of the consistent and sharp edges that you will produce.
Turning tools are more akin to planer knives than bench chisels considering the lineal feet they cut in a short space of time. For that reason you should be sharpening at least three times in one bowl (1. rough cut outside, 2. finish cut outside/rough cut inside, 3. finish cut inside). It’s not unusual to have to sharpen more than that depending on the size of your project and material used. It’s not hard to see that sharpening is an oft-used skill and the more repeatable it is, the better your turning will become.
You MUST be good at sharpening woodturning tools, like it or not. A grinding jig will do that for you. I have been turning for over 50 years and I use a jig as do many, many world-renowned turners.
Hi Ed:
How do I sign up for your Sharpening demo and how do I pay I would very much like to join you in this demo Gerry V
Hi Gerry. Just go to http://www.edswoodturning.com then click on Interactive Remote Demonstrations in the top menu bar. It will take you to the schedule then “Sign up now”. That takes you to a list of all my demos. then click on Add to cart on the one you want.