Stand-Alone Tool Carousel

Free standing tool carousel

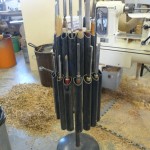
 At one time my lathe was against a wall so storing my tools was a simple matter of providing a rack on the wall. When I got serious about turning I moved things around to get the lathe out in the middle of the shop. A wonderful thing at cleanup time but where to keep my tools? I decided to make a self-supporting carousel that I could easily move when required.  It doesn’t collect shavings and tends to keep me organized because it is easy to use and close at hand.  I chose to configure the carousel in two tiers because the number of tools I have would make a very large and ungainly unit that would be quite unstable. This one is quite compact and still has room for more tools on the bottom tier.

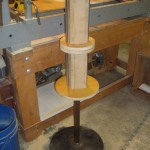
I’ve included some photos that I think are pretty self explanitory. The top tier holds spindle turning tools and bottom tier holds bowl turning tools. The top tier is a bit un-nerving with all those sharp spears waiting to take an eye out (yes, I listened to my mother) so I keep a bucket over them when not in use to keep from gouging myself – literally. Reaching across rather then turning the carousel can be a bit scary but I cured myself of that. The base is an old harrow disk so is very stable, easy to sweep around (tapered to nothing at the edges) and rolls along simply by slightly tilting the whole affair with the thrust bearing letting it roll  to another location.   

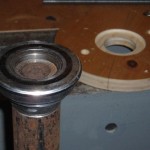
Thrust bearing and recess turned in top plate.

 The bearing is a somewhat complicated affair used only because I had a thrust bearing and a metal lathe to adapt it. A far easier method for most (and me if I wasn’t so stubborn) would be to use a Lazy Susan bearing. Obviously the base can be anything one wants (maybe even a small cabinet) with wheels to make it easy to move around.  


Naked set up ready for sleeves

 The sizing of the plywood circles for the top tier was critical and a little hard to calculate exactly without calculus because the ABS sleeves don’t contact each other at exactly 180 degrees. I did fine with a bit of ordinary math, guestimation and flex in the ABS, but the key was to keep the top tier tight to support one another. You will note the top two plates are the same diameter. The top plate of the lower tier is also that diameter because the lower sleeves fasten outside of the upper sleeves. The lower plate of the lower tier reflects the larger diameter of the second tier. You will also note that because the sleeves on the bottom tier don’t touch each other, two different diameters can be used for the sleeves, accomodating the larger handles on some bowl gouges. The bottom screws holding the sleeves to the plywood double as bottom stops in most cases. For shorter tools I simply put a screw through the sleeve at the appropriate length. All bottom stops have a piece of rubber fuel line over the screw to provide a bit of cushion for the tool handle. The top screw is easily accessed because the tops are cut at an angle which also aids in removing and replacing the tool. If a sleeve is holding a longer tool requiring a stop lower down, the bottom screw securing it to the plate is accessed through a larger hole on the outside. The killer ready-rod I used, like the bearing,  was some I had on hand. If assembling yours in this way, I am sure 1/4″ or 5/16″ would be fine. In my case everything hung from the top plate requiring something to hold everything together in tension. If you use a Lazy Susan bearing you won’t need it because everything will be in compression so you can simply screw everything together. 

Inverted bucket protects the tools and me when not in use.

 If I were to do anything different I might raise the whole unit a bit so that the top tools weren’t staring me straight in the eye, although I would still keep the bucket over them just in case. It hasn’t been enough of a concern to make me change it now that it’s made, but clearly that height is significant to each user.  

As always, I encourage your comments and questions, so please refer to the tag line at the bottom of the article to post a comment.  

Posted in Lathes and Tools, Woodturning Tech Talk | Tagged | 1 Comment

New Gallery Opening

Last night I attended the opening of Fluff Rentals’ new gallery, Fluff For Keeps. As galleries go this one is a bit different. Fluff Rentals offers interior design services and up until now only rented the necessary furnishings. Their target market for the new retail section is professional designers and customers of their design services rather than the public at large. That being said, the emphasis is on fine furnishings and to a lesser degree, art that compliments their style: enter – the woodturner. The owner, interior designer Patti Houston, saw my work at the Mind and Matter Art Festival in July and vowed to have one of my pieces in her newly renovated home – which I am working on right now. She recently branched out into her new retail addition, selling furnishings and art (hence the “for keeps”) and asked myself and a painter, Nicole Carrie to exhibit our work in her new retail section.

Throughout the evening there was terrific interest in my work.  As I was taking off my jacket I was approached by a woman asking about my work, stating that she wanted a piece but in a specific colour, so the evening seemed promising right away. Throughout the evening I found myself explaining my processes and generally discussing turned wood art to several very attentive people. It was no surprise that none were even aware of the depth of our craft and  were further blown away with the use of colour in my work. It was an ideal opportunity to educate some very influential people about turned wood art.

Vancouver Sun reporter Lucy Hyslop submitted an article in today’s (November 26th) paper reporting on the opening, and I quote (ahem :)) “Houston tries to represent local artists such as ceramicists and painters and cites her showcasing of the “stunning” woodturner, Ed Pretty and the “to-die-for” paintings of Nicole Carrie…”

Considering the clientele, this may be an unexpected break for not only myself but turned wood art at large because in  an email this morning Patti requested as many turning as I could produce.  It seems that in spite of a snow storm that kept many attendees (read: designers) away, there was still an overwhelming interest in woodturning.

As you might expect, the piece for Patti’s new home is going to be very special.

As always, I encourage your comments and questions, so please refer to the tag line at the bottom of the article to post a comment.

Posted in General | Tagged , , , , | 4 Comments

Congratulations to Art Liestman

Art Liestman is a friend and co-member of the Greater Vancouver Woodturners Guild. Art is one of those un-assuming people who, although he has many things he could brag about, never brags at all. He willingly shares what he knows with others yet is right in there with the rest of us when there is something new to learn, never leaving the impression that he is somehow at a higher level. He is the founder of the guild, he is an insightful artist who has inspired many of us to do our best and he is an artist of note in the international woodturning community. Because Art never brags, I am going to have to do it for him here.

Art recently returned from Chicago where his work was showcased at SOFA (Sculptural Objects and Functional Art), an annual international art exposition in Chicago. That in itself is big enough news but he was able to top even that. In Art’s typical style, 0ne evening at a meeting he said, “Come over here for a minute, there’s something I would like to show you”. I followed Art over to his seat where he showed me a copy of Craft Arts International, an Australian publication showcasing both established and emerging artists around the world. There was a small sticky tab part way through so I dutifully turned to that page, only to see a  feature article on none other than our very own Art Liestman. His work was showcased pictorially and there was an excellent write up on Art, his history and his inspiration. He had nonchallantly handed me something that was clearly a crowning achievement, yet presented it as though it was just another article of general interest.

I didn’t have the opportunity to read the article in its entirety but thankfully a member of WoW (Woodturners on the Web), Denise deRose, had taken the time to photocopy the article and post it on the blog in pdf format. At the risk of violating enough copyright laws to put me in jail for a couple of years, I am reposting her file below with thanks. Please read the article about Art Liestman, an international artist of very deserved acclaim, who considers himself  simply a maker like the rest of us.

ArtLiestmanCAI- 80[1]

As always, I encourage your comments and questions, so please refer to the tag line at the bottom of the article to post a comment.
Posted in General | Tagged , , | Comments Off on Congratulations to Art Liestman

Drying wood with Silica gel

Some time back a woodturning friend had a brainwave when his wife bought some silica gel (which is, in fact, in bead form) for drying flowers. He thought if it could dry flowers, why not wood? He presented the idea to the guild, citing a couple of small plates as examples of the success he had achieved.  When I dry wood for re-turning or to completion I use both the “shelf” method and the microwave (I have my very own :)) depending on my need for speed and of course size. Mostly I use the microwave for hollowforms and tubes while large bowls and platters get the “bag and switch” treatment if they are of any size. My issue with the latter is that I am not that disciplined that I monitor things religiously enough over long periods. The microwave on the other hand  can be a bit too aggresive requiring each piece to be monitored carefully during the process. The silica gel seems to be in between the two methods so adding it to my arsenal seemed like a good idea.  

Silica Gell sold by Lee Valley

I purchased a small jug of gel from the Lee Valley Tools gardening catalogue. Lee Valley’s gardening section – to me at least – goes completely un-noticed. I did not inherit my mother’s green thumb nor her love of mucking around in the garden. Nor was she able to instill any horticultural desires through endless hours of forced weeding; I preferred my father’s shop.  But I digress. The gel is available in 2 Kg. containers for about $20+ dollars, as I recall. The instructions include three methods of use: “air” drying, oven drying and microwave drying. Basically, the air method takes 5 or more days, the oven method requires a few hours and the microwave even less. The air dry method is much faster than traditional “shelving” methods, the microwave method adds a greater element of control and the oven method is – to me at least – a new tool completely. All three require a container to hold both the piece and the gel, so obviously it needs to be compatible with said shelf, oven or  microwave.  A word of advice: although various kitchen bowls might be ideal from your perspective, that view will probably not be shared by all in the household. Like the  microwave – you may have to get your own :(. The piece must be completely covered so the container should be just large enough to accept the piece and of course you must have enough gel to cover the piece: you may have to buy more than one jug. 

My first venture was with a small hollowform turned from green, spalting Arbutus turned to about 1/2″ wall thickness with a fairly large lump of wood where it had been chucked. It was a shot in the dark because the wood was quite spalted. I kept it in the material for 5 days as per the instructions (for drying flowers). It had lost all its weight in water because reburying it for another few days caused no additional change in weight. There was about the same change in dimension as I would have expected in any other drying method but unfortunately there was a crack through the large chucking mass which could be expected (it dried slower than the thinner portion).  The only thing left was to reconstitute the gel by drying in the oven. All in all, not a bad first experiment considering the short drying time.  

Next effort I will fill the vessel with silica gel but also bury any portions that have a heavier cross section so that water is pulled from that portion at about the same rate as the thin portion. Hopefully drying in this way may not cause the uneven shrinkage.  

As always, I encourage your comments and questions, so please refer to the tag line at the bottom of the article to post a comment.  
 

Posted in Drying wood | 7 Comments

I’m pretty stoked about this one.

After. Now that's better.

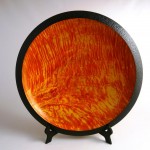
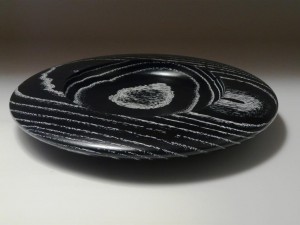
I am a member of a website called World of Woodturners (WOW) where members post pictures of their work as well as comment on pieces, ask questions and offer suggestions. The membership reaches around the world and counts many well-known names familiar to many of us. Today I posted the picture of the winged bowl in my post earlier about gilding. Each day one of a few appointed people select their choice of a photo for the “cover”, which is the lead picture on the front page of the blog. Pascal Oudet selected the picture of the winged bowl today and I received several very supportive comments about the finish. Much credit to Eric Lofstrom who provided the actual turning.

Membership on the blog is by invitation. If anyone is interested in being a member, please advise me by email. I will require your name and email address to send an invitation.

As always, I encourage your comments and questions, so please refer to the tag line at the bottom of the article to post a comment.
Posted in Colouring wood, Finishing, General | 1 Comment

Colouring class in my shop

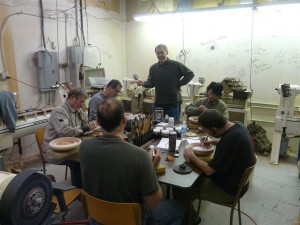
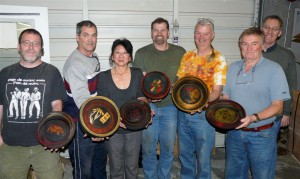
The gang of six plus one

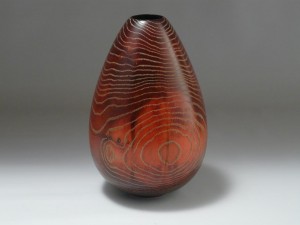
A while ago a friend in the Greater Vancouver Woodturners Guild asked if I would tutor him in some of my techniques. David was specifically interested in my use of dyes and other colour mediums but was also interested in woodturning methods in general. He felt that there were a  few others who would be interested as well. After a brief discussion I felt I had a handle on his needs and we agreed to work on a date. He assembled five more interested fellows and we all agreed on November 6th. I had about a month to work up a lesson plan for a woodturning and colouring class based on their needs and assemble the materials I needed; bowl blanks, dyes, latex gloves, test blocks and various other necessities. I offered to provide (in truth my wife, Arlene provided) lunch and coffee just to make the day complete.

I have four lathes in total including my Oneway and three mini lathes, David organized two more so we had the six that we needed. I have enough room in my shop for six lathes with a bit of elbow room as well as room for a “colouring station” so we were set.  The day began with  my chainsaw and general old-stuff tour while everyone dove into the coffee and donuts (provided by one of the guys). I explained the layout, what we would be covering during the day then launched into a presentation on grain orientation with regard to design, function and tool requirements. Pretty basic stuff but we had a rank novice and a couple who had not done that much turning.

One apparently advanced to hollowforms 🙂

After discussion and demonstration, they turned  a small basic bowl that they could try some colouring techniques on later. Because David and one of the others were acomplished turners, I was able to move between the remaining four, helping them over hurdles as they got to them. Before lunch they were all at about the same stage and ready for a break.

Lunch was great. The hostess-with-the-mostest had everything ready for the troops and it was delicious. Before returning to the shop I took a few minutes to discuss some of my finished pieces in the house. By seeing the end result first, the methods that I discussed in the shop later would make more sense.

By 4 o'clock you should be able to do this.

Out to the shop again where everyone completed their bowls, sanded them using air-driven and manual sanders, finished the foot and carved the small center nub off with a power carver. I gave a short demonstration using dyes on a couple of different grain patterns then turned them loose with the dye on a pile of prepared sample pieces. They tried dying, sanding back, adding second colours and then a couple tried airbrushing and blending on their bowls.

It was all business. No Tomfoolery.

It was a full day with all of them declaring they had a lot of fun. I have always enjoyed helping people learn new things and this day had been better than most. If the emails I received later that evening are any indicator, there will be lot more coloured turnings in future instant galleries.

As always, I encourage your comments and questions, so please refer to the tag line at the bottom of the article to post a comment.
Posted in Colouring wood, General | Tagged , , | Comments Off on Colouring class in my shop

Gilding

Well this was a first for me. I have always admired gilding on various pieces that others have done. Enough that I knew I would get around to doing something myself one day but never finding any pieces that were suitable. I’ll be darned if two didn’t crop up at the same time just the other day. Actually, one has been glaring at me for some time before the idea of gilding popped up but because that was on my mind, the next one presented itself in short order. 

Before. Not the stunner I was looking for.

Both were pieces that had a problem; one missing that certain something and the other with a built in design opportunity. The first one was a collaboration piece with Eric Lofstorm. Eric had turned a winged bowl while demonstrating for the Fraser Valley guild and donated it to the guild for auction. My part was to tidy up the turning and apply a finish. I chose to dye it (big surprise) since it was a lovely little piece of quilt. The multi stage dye worked out well on the quilt but the fading I applied in the teeny bowl portion didn’t turn out the way I had pictured. I applied a lacquer finish and pouted. One day it occurred to me that gilding the bowl would spark it up and provide the central focus I had been hoping for, so I planned a trip to Opus to pick up some gilding materials. Before I could get to the little winged bowl, I turned another piece that begged for “something else” to finish it off. I had a lovely piece of Silver Maple burl that I made into  a slender fluted vase shape with a natural edge rim. Unfortunately a stubborn bark inclusion just wouldn’t go away as I turned. The inclusion wasn’t very attractive but as I was turning it, rather than loose the majority of the wood to get rid of it, it occurred to me that I could use it as a feature if I gilded it and then matched it around the natural edge. I had gone from never having done any guilding to two pieces waiting on deck. 

After. Now that's better.

At one time foil gilding was an art reserved for a very small group of highly skilled artisans who practiced their trade for years before achieving beautiful results. Although I am sure that my effort would be considered bumbling in comparison, the materials that are available now made me look pretty good on my first attempt without wasting a king’s ransom on the floor. I was very pleased with the outcome. When I found the materials at the store I was able to pick up some sample packs of foil with some small bottles of size and top coat, large enough to do the job. Since I had only small areas to do, I picked up a package of simulated plain gold foil as well as some variegated material without putting too big of a dent in my pocket. The same thing that draws me to figured wood probably drew me to the variegated more than the plain gold, but I got both anyway. The foil is synthetic rather than real gold and I am thinking something in the mylar family: definitely some kind of plastic. Never mind sneezing, don’t even breathe hard around this stuff.  

Taking advantage of a "design opportunity".

I  watched a demo on gilding eons ago and read little bits here and there along the way, so had an idea of what I was in for. One of the reasons I chose the sample packs was that they had instructions included. They seemed pretty simple and they certainly were. I had to apply a glue size, let it dry to a tacky stage, apply the foil and top coat then I was done. The glue size stays tacky for 24 hours so I had lots of wiggle room if things dragged out. The foil was a bit of a stinker to handle with my stubby, chubby fingers but both projects required small pieces to be applied to follow the tight curve of the bowl and the convoluted surface of the natural edge. In some cases a pair of tweezers were pressed into service to handle the tiny bits. An artist’s brush is required to pounce (multiple “taps” with the brush ends) the foil into place on the surface. Understandably, the pieces of foil overlapped but it is so thin that when the area is completely covered, simply brushing the foil wisks away any foil that is not on the glued surface, leaving no overlapping material and no ragged edges. In the end it looked like one continuous sheet. Voila! A master on my first attempt. 

I’m not so foolish to think that that is all there is to this gilding thing. I know there is more and I sure wouldn’t try it with the real thing until I had a far better handle on things, but I am definitely sure I have a new tool in the box. My only problem will be to not  add gilding to everything in sight in the near future. It sure was easy and looked great on the pieces that I had chosen. 

As always, I encourage your comments and questions, so please refer to the tag line at the bottom of the article to post a comment.
Posted in Colouring wood, Finishing | Tagged , , | 2 Comments

Skews: oval? flat?

As I proof read my last post it occurred to me that one point of interest (confusion?) to new turners is the option of flat versus oval skews. Here is my opinion on the topic, and as they say, that and a buck and a half will get you a cup of coffee.

Throughout recorded turning history skew chisels have been flat. Oddly enough my grandfather’s monstrous (weighs about 10 pounds) skew chisel is flat but is sharpened 90 degees across rather than skewed. But I digress… The point being that this hundred plus year old tool was obviously used successfully to turn pommels, beads and barrels on countless porch posts. The techniques used then were exactly the same as now and once mastered, a turner had no difficulty achieving the desired results.

Enter the 20th century and the age of marketing. About 20 years ago oval cross section skews began appearing on catalogue pages. They were touted as being the answer to rolling the perfect bead and generally making life easier with this seemingly unstable tool. I believe manufacturers were preying on unskilled turners who were without the advantage of teachers once the craft drifted into the background after the advent of automatic copy machines. Without proper training and very little written instruction, how could they know how to use it and how could they know when someone was having them on (B.S.-ing them)? By simply stating that the tool was easier to use, unskilled turners flocked to the till in hopes of finding a solution to their woes. Naturally, anyone who bought one had no choice but to support the notion that the oval skew was the answer to the problem. Secretly they still struggle in their basements and garages with a tool that didn’t perform as promised. I know because many have come to me, still seeking a solution to their woes.

Supposedly the rounded top and bottom makes rolling a bead easier and the oval cross section makes it easier to ride along the tool rest – or something like that. The truth is, to perform these cuts the same tool action is required for both flat and oval skews, so I see no advantage at all in the oval skew. Understanding how to use the tool for a planing cut and rolling a bead is the real answer, not changing a tool that works satisfatorily in the first place. In my view, removing metal to form the oval makes the tool weaker than if it was full dimension material. Worst of all, an oval skew is a nightmare to sharpen evenly, requiring yet another jig supplied by the manufacturer for repeatable results. Good deal… for them. The oval skew tends to rock on its oval cross section making it difficult to balance the grind side to side. By using a flat tool rest and simply presenting the cutting edge of the flat skew to the wheel in line with the axis of the grinder, an even grind is easily replicated.  One final advantage a flat skew has over an oval skew of equal size: Mass. Tool mass is the woodturner’s friend, helping to conquer vibration.

I can say all that because at one time I actually owned an oval skew. It didn’t solve my problems, I finally learned how to use my old ones properly and promptly sold it to someone who was convinced they were the bees knees. A year later he came to me for lessons on how to use a skew. 🙂

Some turners prefer to sharpen their regular skew with a radius cutting edge, apparently to prevent catches. Again, if used improperly without supporting the cut with the bevel, a catch is just as imminent as with a regular straight grind. In reality it offers no advantage while making it tougher to roll a bead and harder to sharpen. The only modification I can think of that makes a regular skew perform better is to “break” and polish the corners of the tool to prevent damage to the tool rest and make it easier to slide along the rest. In my mind this no different than sharpening a tool – it’s just something you do to the tool to get it ready for service . 

So, both tools require exactly the same handling technique to produce beads and barrels. A regular skew is as strong as the material can be within the dimension of the tool and is relatively easy to sharpen (second only to a scraper) while an oval skew is weaker  because material has been removed from the maximum cross section and is also hard to sharpen. Your choice, but mine is with the tried and true. 

The oval skew is not a magic bullet – proper technique is. I will discuss the techniques required for bead rolling and planing cuts in another post.

As always, I encourage your comments and questions, so please refer to the tag line at the bottom of the article to post a comment.
Posted in Woodturning Tech Talk | 3 Comments

The dreaded skew is not so dreaded. Trust me.

Like most turners, my first experiences with the skew were tense sessions sometimes ending successfully and sometimes not. Of course we all have known the agony of defeat, experiencing at least one “catch” in our career. And even if you haven’t you have heard the tales from other happless turners. Over time I was able to master the tool and in fact, now use it with complete confidence – even making flowing pommel cuts and roughing from a square. How did I get here from there? By simply applying the ABC’s of cutting with a turning chisel. And practicing.

A, B & C. Bevel is contacting wood 90 degrees to rotation

ABC: anchor, bevel, cut.  Anchor the tool on the tool rest, apply the heel of the Bevel to the work first, rotate the cutting edge toward the work until it engages the work so that it begins the Cut, supported by the bevel. It’s just that easy. The dreaded “catch” (with any turning tool, really) occurs when the cutting edge is unsupported by the bevel.

I have long suspected that the greatest barrier to turners first learning the skew is the fear of the tool generated by the horror stories told around campfires by turners who have gone before them. They are legion. because of this built-in fear, they just know that disaster awaited – a self-fullfilling prophecy. One day I set out to prove to myself that this was the case. I talked a friend into buying a lathe (screaming deal on an old Beaver) and he agreed, subject to me teaching him how to turn. He had never heard of the dreaded skew. On the Big Day I decided to try my theory, so told him we were starting with the easiest tool: the skew. I explained the ABC rule and he pushed off, happy that he would reach the far shore safely. Before lunch he was roughing, turning smooth barrels and actually rounding a few broad beads. After lunch we tackled the gouge, a far more difficult tool. He was glad we had saved that less stable tool until later when I showed him how the side could catch if the tool was not supported on the rest in line with the cutting portion of the curved cutting edge. So there you have it, pre-concieved notions can do amazing things.

Cutting occurs at the heel for turning beads.

I believe that anyone can use a skew with confidence if they observe a few basic principles. First, of course, apply the ABC rule as you would with any turning tool used for cutting. Second – and this one is often the key – use only a sharp tool. If the edge is dull it will be held off the work, supported by the heel of the bevel and the rounded shoulder behind the edge, therefore effectively flying above the work. To make the edge cut, there is a tendancy to twist the handle to engage the edge thus removong support for the tool, allowing the edge to dig in and the catch begins. This can also occur if the tool has not been honed after grinding. When fresh off the grinder there is a burr on one side of the cutting edge, so the tool cuts very well one way but not the other (the side with the burr). If the burr side is used there is the same tendancy to lift the heel of the handle to engage the cutting edge and the catch begins. The point here is to hone both sides of the tool using the heel and toe of the bevel as a guide (same as ABC). The tool should be presented to the work at such an angle that the heel and toe of the bevel bear on the work in a line 90 degrees from the work. That way there is no “turning moment” or twisting action caused by the  downward thrust from the rotating piece. This is actually true of all turning tools. In general you will be using the center portion of the tool’s cutting edge for most work when holding the tool in this way when turning straights, tapers or barrels (yes, and even shallow coves). If cutting beads or pommels only  the short heel of the edge is used, otherwise the cutting point will not be 90 degees in line with the heel contact point and a catch or dig will result. In this case, a ring of waste wood ahead of the tool rather than the usual ribbon indicates proper cutting as in the photo above. If you are getting two short tapers instead of a rounded bead, this is your problem.

A catch - rotating the work by hand

It often helps a great deal when learning to use any turning tool, to turn the lathe off and place the tool against the rounded stock (spindle or bowl) following the rules described above (see top photo in post). It’s far safer than when the lathe is under power, hence a lot less scary. At that point, holding the tool with one hand and turning the work with the other, it is easy to see what is going on. The real learning begins when you place the tool in less than optimum positions to see what happens as in the photo at left showing the start of a catch.

So first, use only sharp tools – scary sharp. Second; follow the ABC’s. Keep the supporting portion of the bevel in line 90 degrees to the rotating work. Third; practice, practice, practice.

As always, I encourage your comments and questions, so please refer to the tag line at the bottom of the article to post a comment.
Posted in Woodturning Tech Talk | Tagged , , | 2 Comments

Stop the presses! Big assist for a vacuum chuck.

Maybe the title is a little over the top but I’m pretty pumped about a stupid-easy fix that I tripped onto for a common problem when using vacuum chucks.

It's a wrap.

Yesterday I was vacuum chucking a hollow form to finish the foot (I usually use a special arbour I have for this). Although not Malcom Zander thin, it was still fairly thin walled compared to most turnings that I put on a vacuum chuck. Like all wood, it leaked – to the point where I felt I shouldn’t procede. Normally a piece will leak in the end grain areas and a little masking tape over the areas solves the problem. This leaked everywhere and being  cheap I didn’t want to use half a roll of tape to solve the problem. I picked up a roll of shrink wrap that I have, tore a piece off and wrapped the hollowform totally with the stuff, including the gasket on the chuck face. The gauge instantly went from a fluttering 5 inches of mercury to about 20 inches with the needle rock steady. The picture was taken after I finished so the plastic was a little thrashed but it got the job done. It will look far more sophisticated next time.

As always, I encourage your comments and questions, so please refer to the tag line at the bottom of the article to post a comment.
Posted in Woodturning Tech Talk | Tagged | 2 Comments